
In summary:
- Designing a « Golden Zone » kitchen is not about buying gadgets, but about creating a system of movement that eliminates strain.
- Focus on horizontal « Zero-Lift » workflows, using trolleys and adjacent landing zones to slide heavy items instead of lifting them.
- Adaptability is key; variable-height surfaces and modified tools allow for comfort whether you are standing, seated, or have limited grip strength.
- Combine physical ergonomics with sensory design, using color, texture, and light to make the kitchen intuitive and safe for all abilities.
- Preserve independence by creating a clear « Kitchen User Manual » for carers, ensuring your personal routine is always respected.
For many seniors, the kitchen slowly transforms from a place of joy and creation into a landscape of obstacles. The simple act of preparing a meal can become a painful series of bends to reach an oven, strenuous lifts of heavy pans, and frustrating struggles with stiff jar lids. This gradual loss of confidence in the heart of the home is a deeply felt experience for those dealing with back pain, arthritis, or balance issues. The fear of a fall, a burn, or simply the exhaustion from the effort can diminish the desire to cook altogether.
Conventional advice often misses the point, suggesting a patchwork of solutions like « get better lighting » or « buy more gadgets. » But a truly safe and independent kitchen isn’t just a collection of accessible products. As a designer specializing in ergonomics for aging-in-place, I’ve seen that the most profound transformations come from rethinking the space as a holistic system of movement. The goal is to design an environment that eliminates the very actions that cause strain—the bending, the reaching, the lifting, and the twisting.
This approach, which I call the ‘Golden Zone’ philosophy, focuses on creating seamless, strain-free workflows. It’s about strategic design choices that make safety and comfort the default, not an afterthought. It’s a shift from adapting your body to a poorly designed kitchen to designing a kitchen that adapts perfectly to you.
In this guide, we will deconstruct the kitchen and rebuild it piece by piece according to these ergonomic principles. We will explore how to manage every key task—from prep to cooking to cleanup—with minimal physical effort, ensuring the kitchen remains a place of creativity, nourishment, and independence for years to come.
Summary: Your Blueprint for a Safe and Ergonomic Kitchen Layout
- Why is a variable-height worktop the ultimate solution for multi-user households?
- How to use a trolley to slide hot pans instead of lifting them?
- Lever taps vs sensor taps: which is better for arthritic hands?
- The error of installing an under-counter oven instead of a side-opening eye-level one
- How to use contrasting colors to help visually impaired seniors find handles?
- How to utilize the ‘dead space’ in a corner cupboard without crawling on the floor?
- How to modify kitchen tools for arthritic hands without buying expensive gadgets?
- How to write a ‘job description’ for a carer that guarantees your specific routine is respected?
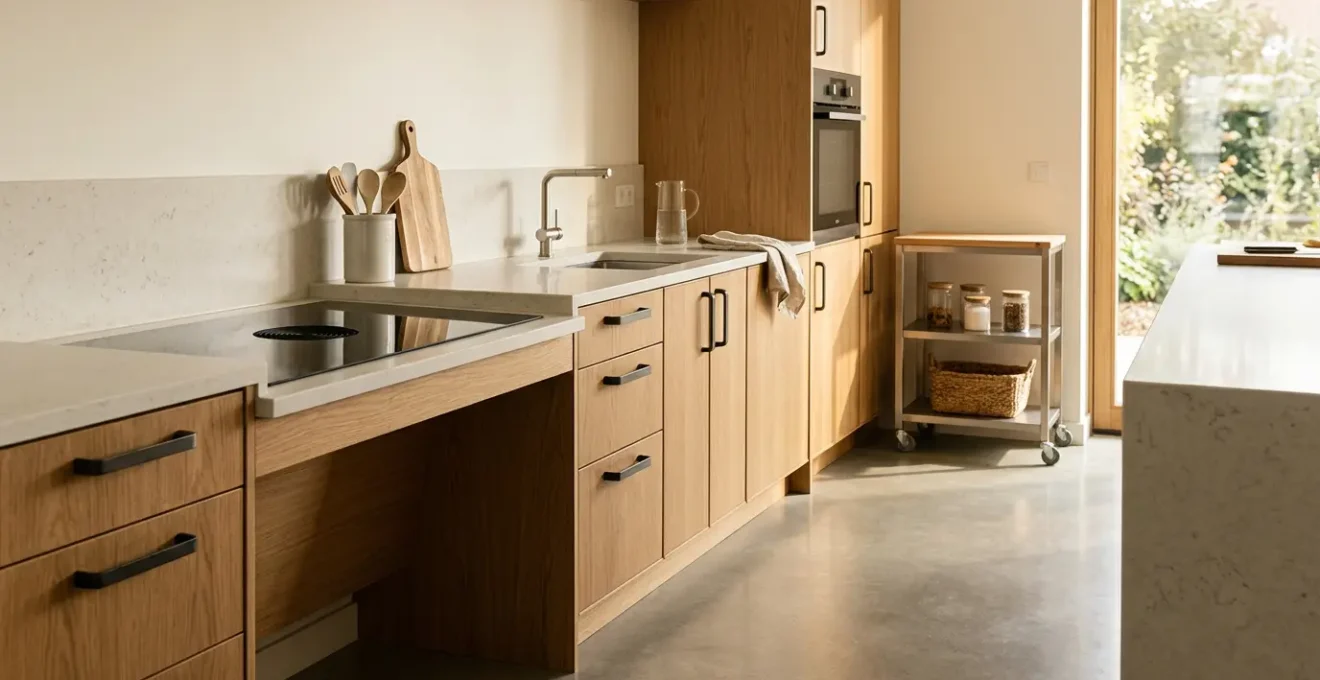
Why is a variable-height worktop the ultimate solution for multi-user households?
The standard 36-inch kitchen countertop is a compromise that, frankly, serves almost no one perfectly. For a tall person, it forces stooping. For a shorter person or a wheelchair user, it’s uncomfortably high. This one-size-fits-all approach is the root of much chronic back pain. A truly ergonomic kitchen embraces dynamic ergonomics—the idea that the environment should adapt to the user and the task, not the other way around. This is where a variable-height worktop becomes more than a luxury; it becomes the foundational element of an accessible kitchen.
Different tasks require different heights for optimal comfort and safety. For instance, forceful tasks like kneading dough are best performed on a lower surface (around 30-32 inches) to leverage body weight, while general prep is more comfortable a bit higher. Crucially, for seated users, ADA guidelines recommend a maximum height of 34 inches to allow for proper knee clearance and a comfortable working posture. A height-adjustable worktop, often with a simple electronic control, resolves all these conflicts. It allows a standing user to work at their ideal height, then lowers to accommodate a partner in a wheelchair or someone who prefers to do prep work while seated on a stool.
Case Study: The Pressalit Indivo System in Multi-User Environments
Companies like Pressalit have perfected height-adjustable systems for care centers, schools, and private homes. Their Indivo worktops demonstrate how a single kitchen can serve a diverse range of users. In a family home, this means a grandparent who uses a wheelchair can comfortably prepare vegetables alongside their standing spouse. It ensures that everyone, regardless of their height or mobility, can participate fully and safely in the kitchen. This technology transforms the kitchen from a static, rigid space into a flexible, inclusive hub for the entire household.
Investing in a variable-height worktop section, even if it’s just for the primary prep area or sink, establishes a core principle of user-centered design. It’s a declaration that the kitchen will serve the people in it, not force them into uncomfortable and unsafe positions.
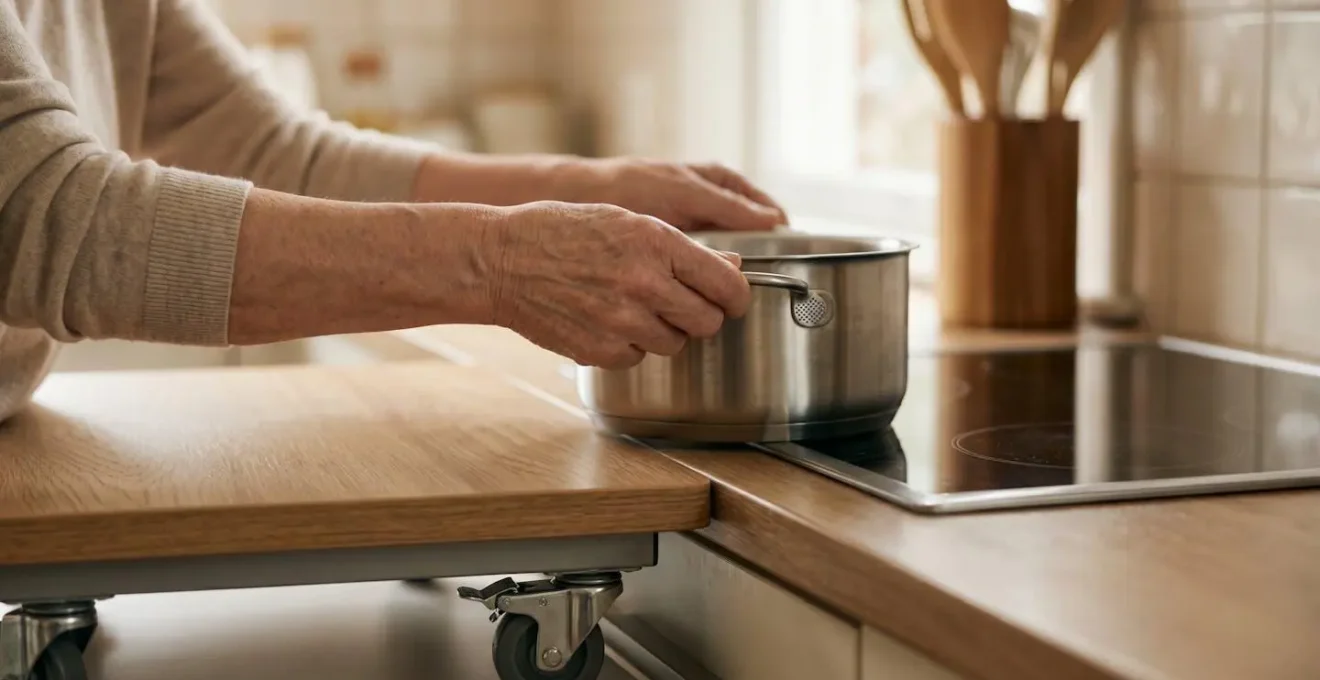
How to use a trolley to slide hot pans instead of lifting them?
One of the most hazardous activities in any kitchen is moving a heavy pot of boiling water or a sizzling cast-iron skillet from the cooktop to the sink or table. This action combines weight, heat, and movement, creating a high risk of spills, burns, and muscle strain. The solution lies in a simple but powerfully effective design principle: the Zero-Lift Workflow. Instead of lifting, you slide. And the hero of this workflow is a humble kitchen trolley.
The key is to use a sturdy, heat-resistant trolley not for storage, but as a mobile landing zone. By ensuring the trolley’s top surface is precisely level with your cooktop, you create a « land bridge. » A heavy pot can be slid directly from the burner onto the trolley with minimal effort and zero vertical lift. From there, the trolley can be safely wheeled to the sink for draining or to the dining table for serving. This single technique eliminates the most dangerous journey in the kitchen.
However, not just any trolley will do. For this system to be safe, the trolley must have specific features. The casters must be large and, most importantly, lockable, to prevent any movement during the transfer. The top surface should be made of a heat-proof material like stainless steel, butcher block, or granite. A small guard rail or raised edge adds an extra layer of security, ensuring nothing can accidentally slide off during transit. This transforms the trolley from a piece of furniture into an essential piece of safety equipment.
Lever taps vs sensor taps: which is better for arthritic hands?
For individuals with arthritis or limited grip strength, the simple act of turning on a tap can be a daily source of pain and frustration. Traditional round knobs require a tight pincer grip and twisting motion that directly strains inflamed joints. While modern design offers two popular alternatives—lever taps and sensor (touchless) taps—one is a clear ergonomic winner for this specific user group: the single-lever tap.
At first glance, a sensor tap seems like the ultimate accessible solution. It requires no physical contact to activate, which is excellent for hygiene. However, its primary weakness lies in temperature control. Adjusting the water temperature often requires manipulating a separate, small, and sometimes fiddly dial, which can be just as difficult as a traditional knob. Furthermore, for users who may lean on the sink for support, the risk of accidental activation is high, leading to wasted water or even a surprise splash. The biggest risk is a pre-set temperature that may be too hot, creating a scalding hazard without immediate, intuitive control.
A well-designed single-lever tap, by contrast, is a masterpiece of universal design. It requires zero grip strength. The flow and temperature can be controlled with a gentle nudge from the back of the hand, the wrist, or even an elbow. The large, flat paddle provides an easy target, and the intuitive forward-back and side-to-side motion gives immediate, tactile feedback for precise temperature adjustment, significantly reducing the risk of scalding. As the following comparison shows, the lever tap offers a more reliable and safer user experience for those with dexterity challenges.
| Feature | Lever Taps | Sensor Taps |
|---|---|---|
| Activation Method | Physical lever operated with wrist/forearm | Motion sensor (touchless) |
| Temperature Control | Integrated single-lever for intuitive adjustment | Separate, often small and fiddly controls |
| Accidental Activation | Minimal risk | High risk when leaning on sink for support |
| Grip Strength Required | None (can be nudged with wrist/elbow) | None for activation, but required for temperature adjustment |
| Scalding Risk | Low (immediate temperature feedback and adjustment) | Higher (pre-set temperature, less intuitive control) |
| Best for Users With | Arthritis, weak grip, reduced sensation, need for support | Severe contamination concerns, hands fully immobilized |
| Integration with Pull-Down Spout | Commonly available and compatible | Less common, may require separate models |
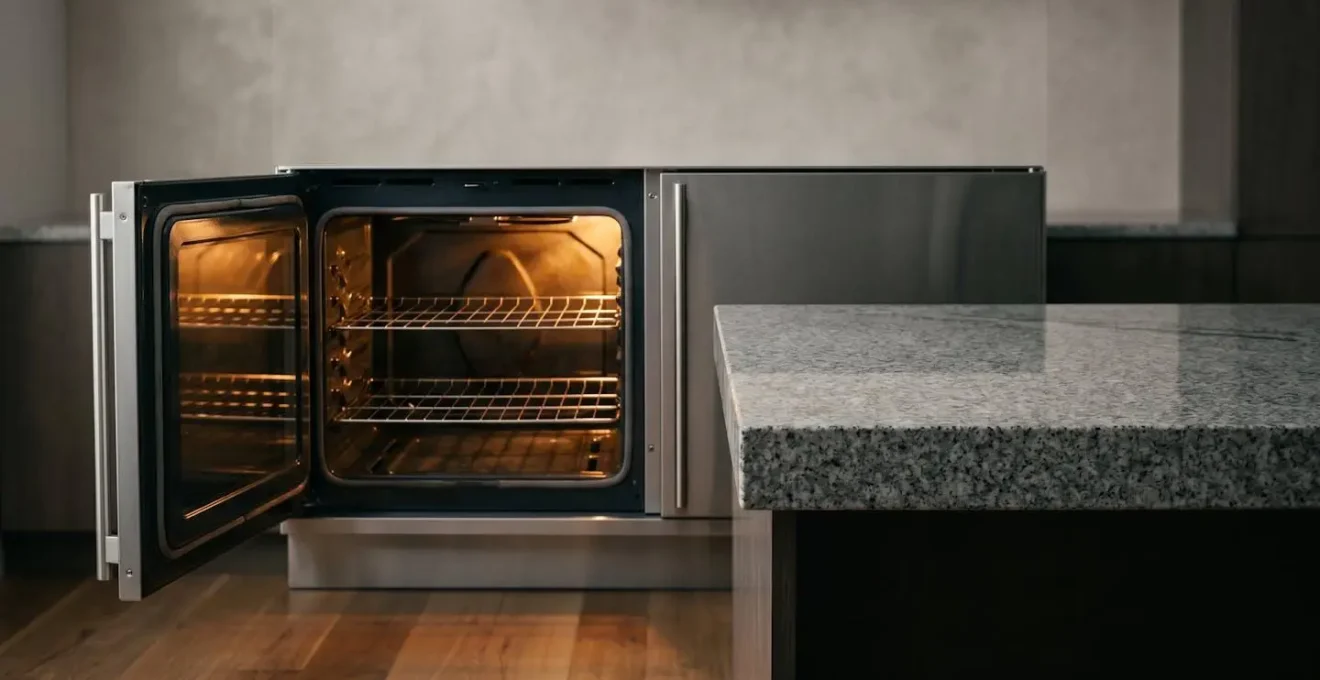
The error of installing an under-counter oven instead of a side-opening eye-level one
There is no single piece of kitchen design more responsible for dangerous bending and lifting than the standard under-counter oven. It forces you to perform a deep squat or bend, open a hot door that creates a barrier, and then lift a heavy, scalding dish up and out from a low, awkward position. It’s a recipe for back strain, loss of balance, and severe burns. As designers, we call this the tyranny of the under-counter oven, and escaping it is the most critical step toward a truly safe kitchen.
The solution is a two-part system: an eye-level wall oven and, crucially, an adjacent, heat-proof countertop. Placing the oven in a tall cabinet unit brings the racks to a comfortable height between your waist and shoulders—the « Golden Zone. » This completely eliminates the need to bend. The second, equally important innovation is the side-opening or « French door » style oven door. As David L. Traut, a CAPS-certified contractor, noted in a Reviewed.com analysis, ovens with side-hinged doors are far superior to the traditional pull-down style because they don’t force you to reach over a hot surface.
This setup creates the ultimate « Landing Zone Principle » in action. The side-hinged door swings out of the way, giving you clear, direct access to the oven rack. You can then slide the hot dish horizontally onto the adjacent countertop landing zone. There is no vertical lifting of a hot, heavy item whatsoever. This seamless, horizontal transfer is the safest possible method for handling items from an oven.
This design choice does more than just prevent back strain. For a wheelchair user, it makes the oven independently accessible. For someone with balance issues, it removes the risk of a fall while lifting. It is, without a doubt, the single most impactful change you can make to create a safer, more ergonomic kitchen.
How to use contrasting colors to help visually impaired seniors find handles?
As we age, changes in vision can make navigating a monochromatic kitchen difficult. Low contrast between cabinets, countertops, and handles can cause key elements to blend together, making it hard to find what you need. With a 2023 report finding that over 27.8% of US adults aged 71 and older experience vision impairment, designing for visual clarity is not a niche concern—it’s a fundamental aspect of safety.
The most straightforward strategy is using high color contrast. This means choosing handles that stand out dramatically against the cabinet doors and drawers. Dark handles on light cabinets or metallic handles on dark wood are simple, effective choices. The goal is to make the « grab points » of the kitchen instantly identifiable. For handle-less modern kitchens, a thin strip of contrasting color can be applied to the top edge of drawers or the side of cabinet doors to serve the same purpose.
However, we can go beyond simple color contrast and create a multi-sensory system of tactile wayfinding. This approach uses touch and shape, in addition to sight, to make the kitchen easier to navigate, especially for those with significant vision loss or for whom glare is an issue. Here are some strategies to implement this:
- Vary Handle Shapes: Use different handle styles for different functions. For example, long, smooth bar pulls for all the drawers and round, textured knobs for all the cupboards. This allows the user to identify the function by touch alone.
- Choose Matte Finishes: Glossy cabinets, countertops, and handles create glare, which can be painful or disorienting for aging eyes, particularly for those with cataracts. Matte finishes absorb light and improve visual comfort.
- Backlight with LEDs: Installing simple under-cabinet LED light strips can be transformative. The light not only improves task visibility on the counter but also backlights the handles on lower cabinets, making them « pop » visually from the shadows.
- Prioritize Larger Handles: Replace small, fiddly knobs with wider, D-shaped or T-shaped pulls. These provide a larger visual target and are also much easier to grip for hands affected by arthritis, as they can be hooked with a finger or the side of the hand.
By layering these visual and tactile cues, you create a kitchen that communicates clearly and intuitively, reducing frustration and increasing safety for users of all visual abilities.
How to utilize the ‘dead space’ in a corner cupboard without crawling on the floor?
The blind corner cabinet is a universal kitchen design flaw. It creates a deep, dark cavern of inaccessible space that forces you to get on your hands and knees, rummaging blindly for a long-lost pot or pan. For anyone with back pain or limited mobility, this « dead space » is effectively unusable and a major source of frustration. Fortunately, modern kitchen hardware offers several ingenious solutions to reclaim this space and bring its contents directly to you.
The goal is to find a mechanism that eliminates reaching and bending entirely. The three most effective solutions are:
- Lazy Susans (or Carousels): The classic solution. These rotating shelves, either kidney-shaped for hinged doors or round for diagonal cabinets, spin to bring items from the back to the front. While effective, they can still result in smaller items falling off and require some leaning to access the center. They are a good, budget-friendly option.
- Swing-Out or « Magic Corner » Units: These are a significant ergonomic upgrade. When you open the cabinet door, a set of shelves attached to the door swings out, and a second set of shelves from the blind corner automatically slides forward into the now-vacant space. This presents nearly the entire contents of the cabinet directly in front of you with no reaching required. This is often the best solution for retrofitting an existing kitchen.
- Full-Extension Corner Drawers: The premium solution, typically used in new kitchen designs. Instead of a cabinet door, the corner is fitted with large, L-shaped drawers that pull out completely. This provides the most organized and 100% accessible storage, as every square inch of the corner is brought out into the open. It’s the ultimate way to defeat dead space.
When choosing a solution, the primary consideration should be the mechanism’s smoothness and the degree to which it brings the contents out of the cabinet. A good system glides effortlessly and presents items within easy reach from a standing or seated position. By investing in one of these systems, you transform the most frustrating spot in the kitchen into a highly efficient and ergonomic storage area.
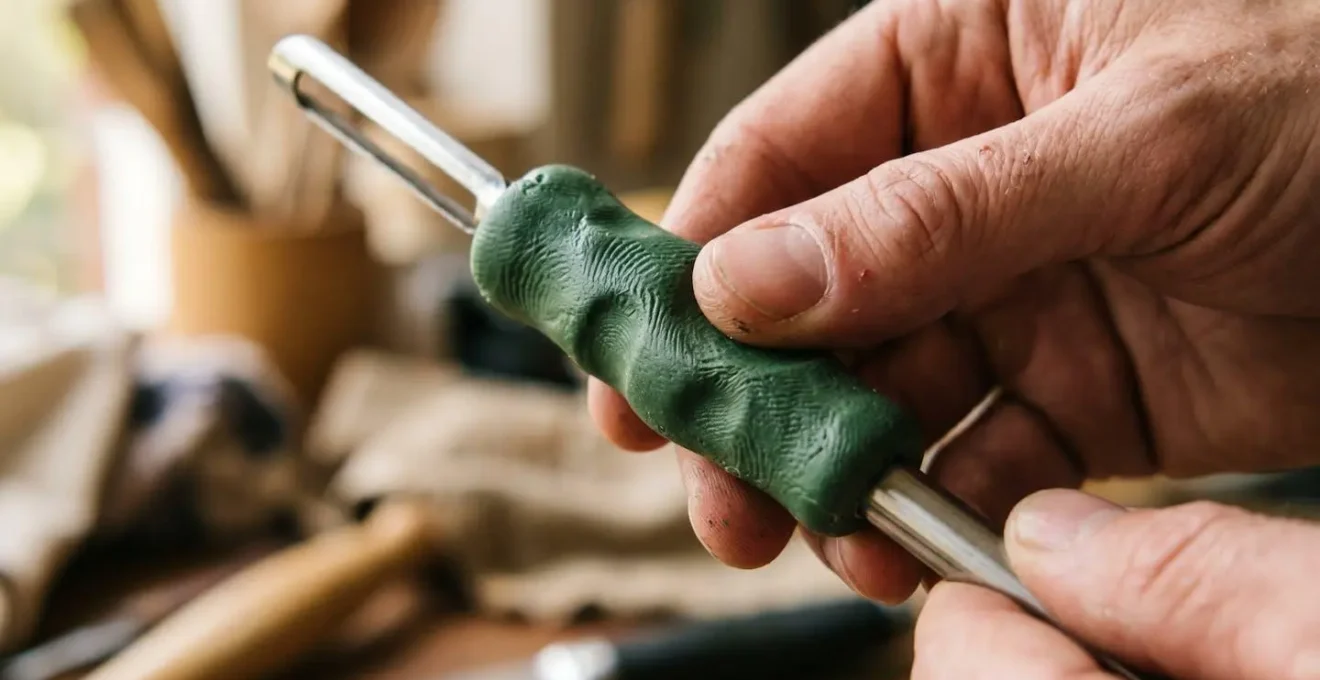
How to modify kitchen tools for arthritic hands without buying expensive gadgets?
The pain and weakened grip associated with arthritis can make using standard kitchen utensils a daunting task. While the market is flooded with expensive « adaptive » gadgets, the secret to reclaiming comfort and control in the kitchen often lies in simple, inexpensive modifications to the tools you already own. This DIY approach is not only cost-effective but also allows you to create custom solutions perfectly molded to your own hands and needs.
The core principle is to build up the handles of thin utensils to create a wider, softer, non-slip gripping surface. This reduces the force required to hold the tool and distributes pressure across a larger area of your hand. A wider grip prevents you from having to make a tight, painful fist. There are several brilliant materials for this, such as moldable glue like Sugru or tool-handle coatings like Plasti Dip, which allow you to create a custom ergonomic grip on anything from a knife to a vegetable peeler.
This philosophy of adapting for a specific need often leads to universally better design.
Case Study: The Universal Success of OXO Good Grips
The iconic OXO Good Grips line was born when its founder noticed his wife, who had arthritis, struggling with a peeler. The resulting wide, soft-handled tools, designed specifically for arthritis sufferers, became a mainstream sensation. This proved that designing for accessibility doesn’t create a niche product; it creates a better product for everyone. This principle can be applied right in your own kitchen.
Beyond handle modifications, simple changes in technique can make a huge difference. A sharp pizza cutter or a rocker knife uses a pressing motion instead of repetitive sawing, making it ideal for chopping herbs or cutting sandwiches with one hand. For opening stubborn jars, the « Jar-Opening Trinity »—using a spoon to break the vacuum seal, a rubber band around the lid for grip, and a rubber glove for traction—is often more effective than any single gadget. These small, clever adaptations empower you to make your kitchen work for you, restoring comfort and independence without a major investment.
Key takeaways
- An ergonomic kitchen is a system; focus on fluid workflows, not just individual gadgets.
- Prioritize horizontal movement (sliding) over vertical movement (lifting) by using trolleys and adjacent landing zones.
- Design for all senses by using high-contrast colors for visibility and varied textures for tactile recognition.
How to write a ‘job description’ for a carer that guarantees your specific routine is respected?
You have painstakingly designed your kitchen to be a perfect, ergonomic system that allows you to maintain your independence. Everything has its place for a reason: the mugs are on the second shelf to avoid reaching, the knives are in the left drawer with a special divider, the trolley « docks » by the counter. Then, a new, well-meaning carer arrives and, in an effort to be helpful, « tidies up »—placing things where they *think* they should go, and instantly dismantling your carefully built system of safety and independence.
This is a common and deeply frustrating experience. The solution is not a traditional « job description, » which is often too generic. Instead, you need to create a « Kitchen User Manual » for your specific space. This is a visual, instructional guide that clearly and kindly explains not just *what* to do, but *why* it’s done that way. This approach transforms the carer from a helper who might unknowingly create obstacles into a collaborative partner in maintaining your independence.
A great Kitchen User Manual is visual and specific. It explains the « flow » of your kitchen from your perspective, helping the carer anticipate your needs and stay out of your primary work path. It’s not about giving orders; it’s about sharing knowledge to foster a respectful and efficient partnership. By clearly defining zones of assistance and zones of independence, you empower the carer to help effectively where needed, while respecting your ability to manage tasks you can and want to do yourself. This simple document is the key to ensuring your personalized ergonomic system remains intact, no matter who is helping in your home.
Your Action Plan: Creating a Visual Kitchen User Manual for Carers
- Photograph Everything: Create a visual guide with photos showing correctly organized drawers and shelves (e.g., a photo of the plate drawer, a picture of the mug shelf) to eliminate any ambiguity.
- Map the Zones: Include a simple diagram showing where the trolley « docks » at night and the designated storage locations for key items within your « Golden Zone » (waist to shoulder height).
- Define Boundaries: Clearly state « Zones of Assistance » (e.g., ‘Please retrieve items from the high pantry shelf’) versus « Zones of Independence » (e.g., ‘I prefer to load the dishwasher myself’) to set clear expectations.
- Explain the ‘Why’: Don’t just say ‘Put knives in the left drawer.’ Write, ‘Please put knives in the left drawer because its custom divider makes them safe for me to grab.’ This explanation fosters understanding and collaboration.
- Document Your Flow: Describe your typical path (e.g., ‘I move from the fridge, to the roll-under sink, then to the prep area’). This helps the carer anticipate your movements and keep crucial pathways clear.
By taking the time to implement these ergonomic principles, you are not just making small improvements; you are making a profound investment in your long-term safety, health, and independence. Begin today by evaluating just one area of your kitchen and planning a single change. This is the first step toward reclaiming the heart of your home.