
In summary:
- The key to a user-friendly kitchen for seniors isn’t a costly remodel, but smart, ergonomic retrofitting of existing cabinets.
- Prioritize solutions that promote good body mechanics, like pull-out systems that require a simple linear pull instead of twisting and bending.
- Organize your kitchen around a « Golden Zone » (waist-to-chest height) to keep 80% of your most-used items within easy reach, drastically reducing strain.
- Before buying expensive gadgets, simple DIY modifications, like adding foam tubing to utensil handles, can provide significant relief for arthritic hands.
The daily ritual of preparing a meal should be a source of joy, not a painful gymnastic exercise. Yet for many, the back of the lower kitchen cupboard is a dreaded no-man’s-land. Getting on your hands and knees to retrieve a pot or a jar of passata isn’t just inconvenient; it can be a genuine risk. The conventional answer often involves expensive custom cabinetry or a full kitchen remodel, options that are simply off the table for most people on a fixed budget. We’re told to buy pull-out baskets, but often the cheap ones buckle and fail, making the problem worse.
But what if the solution wasn’t about spending thousands, but about thinking smarter? What if the principles used by occupational therapists and ergonomic experts could be applied to your existing kitchen with just a few clever, affordable modifications? This guide isn’t about selling you a new kitchen. It’s about empowering you to reclaim your current one. We will move beyond the generic advice and delve into the *why* behind what works. We’ll explore the physics of failing wire baskets, the critical measurement that everyone gets wrong, and how a simple kitchen trolley can be a powerful safety tool.
The goal is to transform your kitchen from a source of strain into a comfortable, safe, and efficient workspace. It’s about preserving independence and continuing to enjoy the heart of the home without pain or frustration. By focusing on body mechanics and strategic organization, you can achieve a high-end, accessible kitchen experience for a fraction of the cost of a remodel. This guide will walk you through the most common challenges and provide practical, money-saving solutions for each.
To help you navigate this process, we’ve broken down the key considerations into a series of focused sections. From understanding product limitations to rethinking your entire kitchen layout, this article provides a comprehensive roadmap for your DIY accessibility upgrade.
Summary: Your Guide to a More Accessible Kitchen
- Why do cheap wire baskets fail when loaded with tins and jars?
- How to utilize the ‘dead space’ in a corner cupboard without crawling on the floor?
- Lazy Susan or Le Mans: which corner mechanism actually maximizes space?
- The mistake of measuring the external width instead of the internal cabinet width
- How to organize a pull-out larder so the heavy items are at waist height?
- How to use a trolley to slide hot pans instead of lifting them?
- How to modify kitchen tools for arthritic hands without buying expensive gadgets?
- How to design a ‘Golden Zone’ kitchen layout that minimizes bending and reaching?
Why do cheap wire baskets fail when loaded with tins and jars?
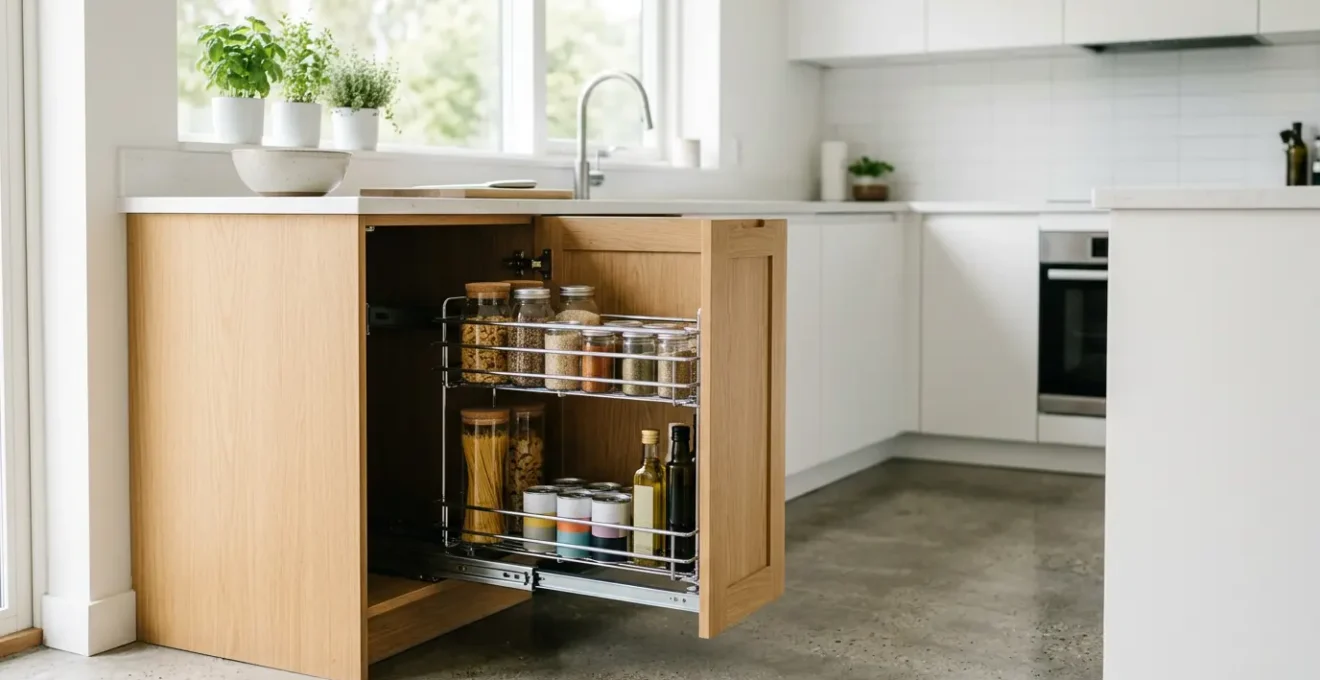
It’s a frustratingly common scenario: you invest in affordable wire pull-out baskets, load them with tins, jars, and bags of flour, and within months they begin to sag, jam, or even break. The reason for this failure isn’t just about weight; it’s about physics and materials. Many budget-friendly baskets are made with a thin wire gauge and weak weld points, creating a perfect storm for structural failure under the concentrated weight of pantry staples.
To put this in perspective, some industrial wire baskets are rated for 132 to 265 pounds, but these are built with thick-gauge steel for factory use. Consumer-grade equivalents, especially at the lower end of the market, have a fraction of that capacity. The problem is magnified by the way they are loaded. A few heavy tins placed in the middle of a basket create a focused point of stress that the thin wire and small welds simply can’t handle over time. The wire deforms, the basket droops, and it starts catching on the cabinet frame.

The image above highlights the critical failure point: the weld junction. On cheaper models, these welds are often superficial. When you pull a heavily loaded basket out, the force and vibration put immense strain on these points. Look for baskets with thicker wire gauges and more substantial, cleaner welds. While they may cost a little more upfront, they are built to withstand the reality of a well-stocked pantry, preventing the need for a costly and frustrating replacement down the line. A basket with a solid base, rather than just a wire grid, also helps to distribute weight more evenly, further reducing stress on individual wires.
How to utilize the ‘dead space’ in a corner cupboard without crawling on the floor?
The blind corner cabinet is perhaps the most poorly designed space in the modern kitchen. It’s a deep, dark cavern where kitchenware goes to be forgotten. Accessing it often requires getting on your hands and knees, a posture that is simply not feasible or safe for many people. Fortunately, there are several tiers of solutions to reclaim this space, ranging from no-installation-required fixes to more advanced mechanisms.
The simplest, no-tools approach is to use multi-tier standalone rotating shelves. These are essentially freestanding Lazy Susans that you place inside the cabinet. They don’t require any screwing or crawling; you simply put them in and start organizing. For a slightly more integrated solution, consider door-mounted shelves. These systems attach to the inside of the cabinet door and swing out automatically as you open it, bringing a set of shelves into easy reach. Installation is minimal, usually just requiring a few screws into the door panel while you are standing.
For maximum accessibility, articulated pull-out systems are the gold standard. These mechanisms, like the Le Mans system, use a sophisticated series of arms to swing shelves completely out of the cabinet opening and place them right in front of you. While their installation is more complex, the ergonomic benefit is unparalleled. Interestingly, some professionals now recommend a surprisingly simple, counter-intuitive strategy:
Design professionals increasingly recommend the ‘void corner’ strategy for some clients, where difficult-to-access deep corners are deliberately left unused or designated for true long-term storage of items used only once or twice per year, eliminating the need for complex mechanical solutions and reducing installation costs while preventing the corner from becoming a cluttered, forgotten space.
– Superior Cabinets, Tips & Tricks
This « strategic non-use » approach is a brilliant, budget-friendly option. It acknowledges that not all storage space is good storage space. By consciously deciding not to use the most inaccessible part of your kitchen, you can reduce clutter, save money on complex hardware, and eliminate a major source of physical strain.
Lazy Susan or Le Mans: which corner mechanism actually maximizes space?
When it comes to corner cabinet solutions, the two most talked-about options are the traditional Lazy Susan and the more modern Le Mans system. While both aim to make the corner accessible, they do so with very different approaches, and the best choice for you depends on what you value more: raw storage volume or ergonomic accessibility. The Lazy Susan, a rotating carousel of shelves, is the classic solution. It can utilize a high percentage of the cabinet’s internal volume, but accessing items at the back of the shelves still requires you to lean in and twist your torso, which can be a strain on the back and hips.
The Le Mans system, on the other hand, prioritizes body mechanics. It consists of kidney-shaped shelves that glide out of the cabinet in a smooth, linear motion, presenting their entire contents directly in front of you. This completely eliminates the need for bending or twisting. While its complex mechanism means it utilizes slightly less of the total cubic space inside the cabinet, it arguably makes 100% of its own shelf space perfectly usable. This distinction is crucial for seniors or anyone with mobility limitations. The best solution isn’t the one that holds the most, but the one that lets you access what it holds without pain.
The following table, based on information from industry experts, breaks down the key differences to help you decide which is right for your needs and your body. As an analysis from Jasmine Advertising & Display shows, the choice is about matching the tool to the task.
| Criteria | Lazy Susan | Le Mans |
|---|---|---|
| Space Utilization | 70-80% of deep corner volume | 60-70% but optimizes usable surface area |
| Accessibility | Requires spinal twisting and leaning to view back contents | 100% visibility – simple linear pull minimizes back/hip stress |
| Body Mechanics for Seniors | Moderate – requires rotation and reaching | Excellent – linear pull-out motion only |
| Best Storage Use | Many small items of similar height (jars, cans) | Fewer, larger, awkwardly shaped items (appliances, pots, bowls) |
| Weight Capacity per Shelf | Varies widely by manufacturer | Typically 25 kg (55 lbs) per shelf |
Ultimately, for storing larger, heavier items like pots, pans, or small appliances, the Le Mans system is ergonomically superior. Its high weight capacity and simple pull-out motion make it a safer and more comfortable choice. The Lazy Susan remains a viable, often more budget-friendly option for lighter, smaller items like spices and cans, provided the leaning and twisting motion is not a concern for you.
The mistake of measuring the external width instead of the internal cabinet width
This is the single most common, costly, and frustrating mistake in a DIY pull-out drawer project. You meticulously measure the front of your cabinet, order a beautiful pull-out basket system, and when it arrives, it doesn’t fit. The error lies in measuring the external width of the cabinet box instead of the true, usable internal width. In older kitchens especially, cabinet walls, face frames, and bulky hinges can eat up several inches of space.
The only measurement that matters is the narrowest point inside the cabinet through which the basket must pass. This is typically between the two sides of the cabinet’s face frame or between the hinges. You must measure from the inside wall to the inside wall, accounting for any and all obstructions. A protruding screw head, a plumbing pipe, or the hinge mechanism itself can stop a project dead in its tracks. A simple tape measure reading isn’t always enough to catch these hidden obstacles.
To avoid this disastrous and expensive mistake, you need a foolproof measurement protocol. Don’t just measure once; measure at the front, middle, and back of the cabinet to check for any inconsistencies. Even better, create a physical template. Before you even think about ordering a product, follow this precise checklist to guarantee a perfect fit.
Your Action Plan: Critical Measurement Checklist for a Perfect Fit
- Measure the Narrowest Point: Use a tape measure to find the internal wall-to-wall width at its most constricted point, which is almost always between the face frames or the hinges, not the external cabinet dimensions.
- Hunt for Obstacles: Run your hand along the inside walls and floor of the cabinet. Feel for hidden obstacles like plumbing pipes, electrical conduit, thick shelf supports, or even screw heads from adjacent cabinets that poke through.
- Build a Cardboard Template: Cut a piece of cardboard to the exact width and depth dimensions of the pull-out basket you intend to buy. If this template can slide in and out smoothly without catching on anything, your product will fit. This is the ultimate test.
- Account for Clearance: Remember to factor in the thickness of the face frame and the space needed for the cabinet door’s hinges to operate. Your measurement must be taken from the narrowest point, including these elements.
- Verify Full Extension Depth: Measure the internal depth from the back wall to the inside of the closed door. Ensure your chosen pull-out can fully extend without being blocked by the door or its handle when it’s open.
Taking an extra ten minutes to follow these steps can save you hours of frustration, the hassle of returning a large item, and the disappointment of a project gone wrong. Measure twice, build a template once, and buy with absolute confidence.
How to organize a pull-out larder so the heavy items are at waist height?
A pull-out larder unit, which transforms a tall cabinet into a series of accessible shelves, is a fantastic upgrade for kitchen accessibility. However, its ergonomic benefit can be completely negated if it’s loaded improperly. The most common mistake is placing heavy items like large bags of flour, sugar, or big jars on the top or bottom shelves. This forces you to either reach high above your head or bend down low, both of which are strenuous and potentially unsafe motions.
The key to a truly ergonomic larder is to organize it based on weight and frequency of use, creating a « Golden Zone » for the heaviest items. Your Golden Zone is the area that requires the least amount of physical effort to access. According to experts in furniture adaptability, ergonomic research establishes that the optimal storage height for safety and ease of access is between 800 and 1100 mm (roughly 31 to 43 inches) from the floor. This is your waist-to-chest-height zone.
Therefore, the rule for organizing your pull-out larder is simple and absolute: all heavy, frequently used items must be placed on the shelves that fall within this Golden Zone. This means large jars of sauce, bags of rice or flour, and canisters of sugar or coffee should live on the middle shelves. This placement allows you to slide the items straight out towards your body, using your core strength for stability rather than straining your back or shoulders by lifting from an awkward angle.
The very top shelves should be reserved for lightweight, infrequently used items like paper towels, extra cereal boxes, or specialty baking supplies. The bottom-most shelf is best for mid-weight items you don’t use every day, such as bulk-buy cans or sealed packets. By strategically placing items according to their weight, you turn your larder from a simple storage unit into a high-performance ergonomic tool.
How to use a trolley to slide hot pans instead of lifting them?
Lifting a heavy, hot casserole dish or a cast-iron pan from the oven or stovetop is one of the most hazardous tasks in the kitchen. It requires a combination of strength, balance, and coordination that can be challenging, and a single slip can lead to a serious burn or injury. A simple, multi-purpose kitchen trolley offers a brilliant, low-cost solution by transforming this dangerous lift-and-carry task into a safe and simple horizontal slide.
The technique, which we can call the « No-Lift Transfer Protocol, » is all about eliminating the vertical lift. First, position the trolley directly adjacent to your stove or countertop, ensuring its surface is level with or slightly below the work surface. Crucially, you must engage the locking wheels on the trolley to ensure it is completely stable. Then, using oven mitts, simply slide the hot, heavy dish horizontally from the oven rack or counter directly onto the trolley. There is no lifting involved, which removes almost all strain from your back, shoulders, and wrists. Once the dish is secure, you can unlock the wheels and safely transport it to the dining table or a cooling rack.
When selecting a trolley for this purpose, safety is paramount. Ensure it has a sturdy, heat-resistant top surface like stainless steel or a thick butcher block, and a robust frame. A system with a minimum of a 4-wheel locking system is essential for stability. But the benefits of a trolley extend far beyond just moving hot items.
Case Study: The Multi-Role Kitchen Trolley
Kitchen designers and occupational therapists have noted that a mobile kitchen trolley serves multiple ergonomic functions, making it a valuable tool for aging in place. Beyond transporting hot pans, it allows for bringing all groceries in a single trip from the car to the kitchen, eliminating repeated carrying and strain. It can also be used to clear the entire dinner table in one go, reducing bending and multiple trips. Furthermore, as highlighted by designers focusing on ergonomics, it can serve as a mobile preparation station that can be positioned at the perfect height for comfortable, seated prep work, turning it into a truly multi-purpose assistive device.
This simple piece of furniture is not just an accessory; it’s a powerful tool for ergonomic leverage, enhancing both safety and independence in the kitchen by replacing risky lifting with simple, controlled movement.
How to modify kitchen tools for arthritic hands without buying expensive gadgets?
Painful or weakened grip strength due to arthritis can turn simple kitchen tasks like peeling vegetables or opening a jar into a daunting challenge. The market is flooded with expensive, specialized « ergonomic » gadgets, but often, the most effective solutions are the simplest and cheapest. The core principle is to increase the diameter of the tool’s handle, which shifts the work from a painful, weak pinch grip (using fingers) to a much stronger and more comfortable power grip (using the whole hand).
You can achieve this with common household items or a quick, inexpensive trip to the hardware store. The most immediate, no-cost solution is to simply wrap a dry washcloth or a non-slip shelf liner square around a utensil handle to instantly make it thicker and easier to hold. For a more permanent and comfortable solution, purchase foam pipe insulation or foam grip tubing from a hardware store. This material is lightweight, soft, and can be easily cut to size and slipped over the handles of your existing knives, forks, spoons, and peelers.
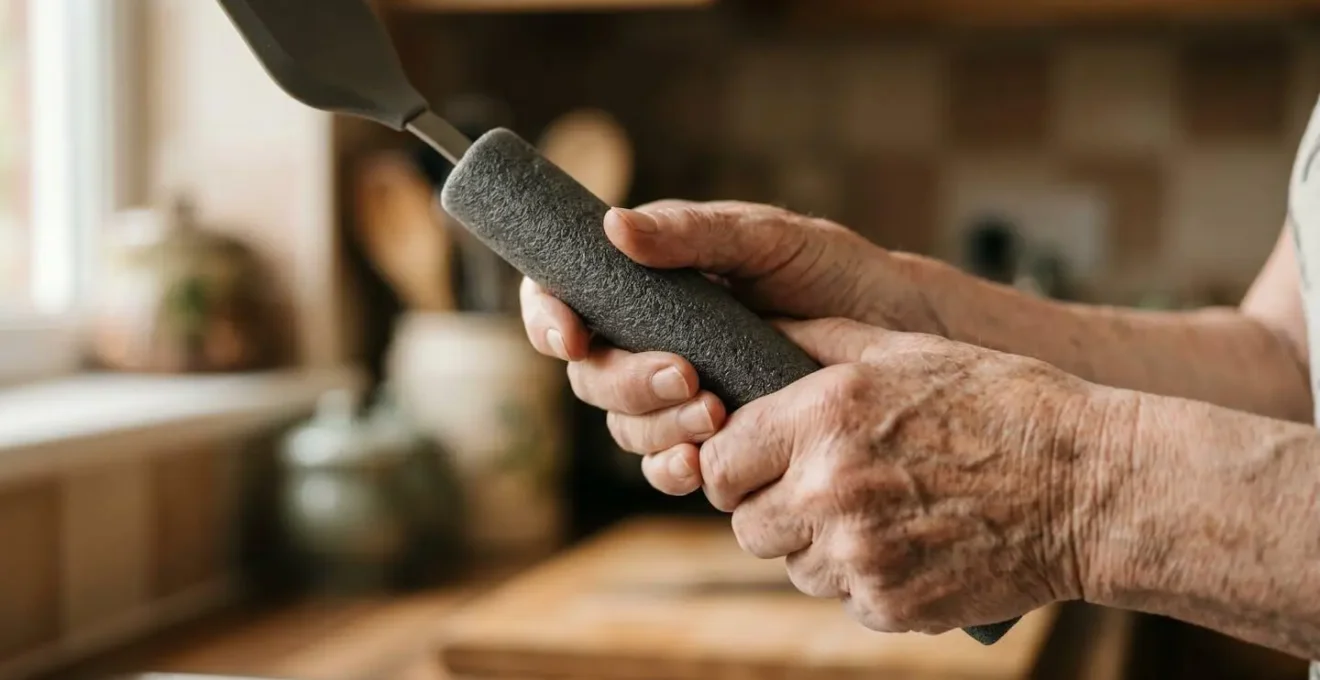
This simple modification is backed by science. A study from a 2016 study in PeerJ found that modified handles with increased diameters significantly reduce the challenges of daily tasks and help protect joint integrity over the long term. Beyond modifying handles, you can also adopt an « alternative tool strategy. » Instead of a standard knife that requires chopping force, switch to a rocking knife (a mezzaluna) which uses gentle body weight and a rocking motion. For can openers, choose a clamp-style model with a large, easy-to-turn handle instead of a small, difficult-to-twist knob. These low-cost adaptations can make a world of difference, allowing you to cook with comfort and confidence without a drawer full of pricey, single-purpose gadgets.
Key takeaways
- The most ergonomic storage space, the « Golden Zone, » is the area between your waist and your chest (roughly 31-43 inches from the floor).
- Prioritize body mechanics over maximizing every square inch of space. A solution that prevents you from twisting or bending is better than one that holds more but causes pain.
- Before buying any pull-out system, create a cardboard template of its exact dimensions to test for hidden obstructions inside your cabinet. This step is non-negotiable.
How to design a ‘Golden Zone’ kitchen layout that minimizes bending and reaching?
We’ve talked about pull-out larders and corner units, but the most powerful ergonomic change you can make is to stop thinking about individual cabinets and start thinking about the entire kitchen as a system. The goal is to create a « Golden Zone » layout, a design philosophy where everything you use daily is stored within a comfortable, no-strain zone. This zone, as we’ve discussed, is the area between your waist and your chest. The aim should be to have 80% of your daily kitchen activity happen within this zone, minimizing bending and reaching.
Achieving this doesn’t require a remodel, but it does require a thoughtful audit of your current kitchen. Over a weekend, take stock of every item. Use colored stickers to label items by frequency of use: daily, weekly, or rarely. This simple act will likely reveal that your most-used items—your favourite mug, your everyday frying pan, the salt and pepper—are scattered all over, some stored too high, others too low. This is particularly problematic as ergonomic research has stated that elderly people have greater difficulty adjusting to inappropriately high worktops and shelves than younger people.
The next step is the great relocation. Your mission is to move every single « daily use » item into the Golden Zone. This is where pull-out baskets for lower cabinets become transformative. They turn that low, hard-to-reach space into prime Golden Zone real estate. A base cabinet that once required kneeling to access can now present its contents to you at a comfortable height. Heavy mixing bowls, pots, and pans should now live in these pull-out drawers. Everyday plates and glasses should be on the lowest, most accessible shelf of your upper cabinets. The area on the countertop between your sink and stove should be cleared to become your primary work triangle, holding only a knife block, a bottle of cooking oil, and your most-used spices.
Items used weekly can go just outside the Golden Zone—on the bottom shelf of an upper cabinet or the top shelf of a pull-out drawer. Rarely used items (the turkey platter, the fancy stand mixer) can be relegated to the highest shelves or the very back of a deep cabinet. By consciously designing your layout around your body and your habits, you create a kitchen that works for you, not against you, reducing daily fatigue and making cooking a pleasure again.
Begin your kitchen transformation this weekend by conducting a simple audit. This first step of identifying and relocating your most-used items into your ‘Golden Zone’ costs nothing but can provide an immediate and dramatic improvement in your daily comfort and safety.
Frequently Asked Questions on retrofitting kitchen storage