
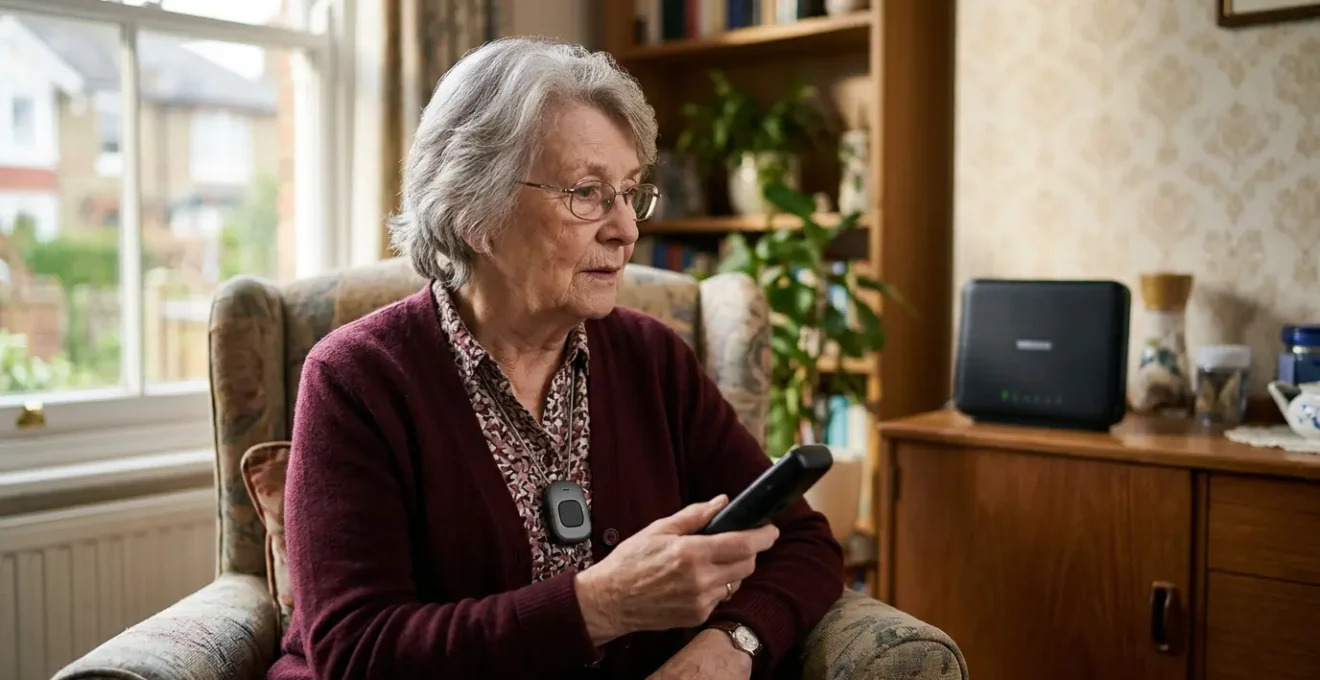
The impending digital switchover introduces a critical, often misunderstood risk: your analogue telecare alarm, which previously worked during a power cut, will now fail because its new digital line depends entirely on your powered internet router.
- Analogue lines had their own power; new Digital Voice (VoIP) lines do not. No router power means no alarm connection.
- An urgent system audit is not just advisable but a non-negotiable safety requirement for the estimated 2.3 million vulnerable users.
Recommendation: Immediately perform a ‘Safe Self-Test’ by unplugging your router and testing your alarm to confirm if it has a battery backup. Waiting until the switchover is complete is too late.
The nationwide upgrade of the UK’s telephone network from analogue to digital, with a completion deadline now extended to 2027, is more than a technical footnote. For millions of seniors and vulnerable individuals who rely on traditional pendant alarms, it represents a fundamental and urgent safety challenge. While providers often reassure customers that their service will continue, this overlooks a critical new point of failure. The old analogue system, the Public Switched Telephone Network (PSTN), carried its own power, meaning alarms worked even during a power outage. The new digital network, Voice over IP (VoIP), does not.
This single change is the crux of the issue. A digital phone line runs through your internet router, and if that router loses power, your line goes dead. Consequently, any analogue telecare device connected to it becomes useless at the very moment it might be needed most. This isn’t a minor glitch; it’s a systemic vulnerability affecting an estimated 2.3 million people in the UK whose safety relies on these devices. Understanding this power-dependency failure is the first step in a crucial safety audit that every user of an older system must undertake.
This article moves beyond generic warnings to provide a technical, urgent guide. We will dissect why your alarm might fail, how to test your system’s resilience, and what immediate, practical steps you can take to ensure continuous protection. From navigating VAT exemptions for new hardware to choosing systems that preserve the character of a period home, this is your essential roadmap for a safe transition to the digital age.
Summary: A technical guide to the digital switchover’s impact on personal alarms
- Why might your alarm fail during a power cut after the digital upgrade?
- How to claim 0% VAT on your personal alarm system if you have a chronic illness?
- Call center response vs auto-dialing family: which is safer for a faller?
- The error of buying a cheap key safe that isn’t police approved
- How to choose a stylish alarm that doesn’t look like a ‘panic button’?
- How to install a non-intrusive monitoring system in a period property?
- Where to position PIR sensors so the light comes on before you reach the step?
- How to adapt a Victorian terrace house for aging in place without ruining its character?
Why might your alarm fail during a power cut after the digital upgrade?
The fundamental reason your analogue alarm is at risk is the shift in how your home phone line is powered. The old analogue PSTN network had a dedicated, low-voltage current sent from the local exchange, making it independent of your home’s mains electricity. This is why you could still make calls on a corded phone during a power cut. Analogue telecare systems were built on this reliable, self-powered foundation. The new Digital Voice system, however, converts your voice into data that travels over the internet. Your telephone handset now plugs into your broadband router, which is powered by a standard mains plug. This creates a critical power-dependency failure.
If a power cut occurs, your router will switch off. When your router switches off, your digital phone line instantly goes dead. Any analogue alarm connected to that line will be unable to make an outbound call to the monitoring centre. This is a catastrophic failure scenario, as power cuts are often accompanied by other emergencies. While some modern digital alarms come with built-in battery backup, millions of legacy analogue units do not. It is a mistake to assume your provider will automatically solve this for you. You must verify your system’s resilience yourself.
Case Study: Telecom Providers’ Proactive Battery Backup Rollout
Recognising this critical vulnerability, major UK telecom providers like Vodafone, BT, KCOM, and Zen Internet launched a collaborative solution in March 2025. They began providing a free Broadband Battery Backup device to vulnerable customers who are landline-dependent or use telecare alarms. This unit can power a router for 4-7 hours during an outage, significantly exceeding Ofcom’s one-hour minimum requirement. The device, made from 95% recycled plastic, even includes a USB-C port for charging a mobile phone, acknowledging the dual need for connectivity and communication in an emergency. This initiative shows the industry is aware of the risk, but customers must be proactive in ensuring they are registered as vulnerable to receive such a device from their provider.
Your Action Plan: The Safe Self-Test Protocol
- Inform a family member or trusted contact that you are conducting a system test (never test alone).
- Unplug your internet router from the mains power supply to simulate a power cut.
- Press your personal alarm pendant button to initiate an emergency call.
- Note whether the call connects successfully to your monitoring centre or contacts.
- If the call fails, contact your landline provider immediately to discuss your vulnerability status and the need for a battery backup solution.
How to claim 0% VAT on your personal alarm system if you have a chronic illness?
Upgrading your personal alarm system to a modern, digital-ready device is a critical safety investment, and the UK government provides significant financial relief to make it more accessible. If you have a long-term illness or disability, you are likely eligible to purchase a personal alarm system at 0% VAT, which represents a substantial 20% saving on the total cost. This relief is not a refund; the VAT is removed by the supplier at the point of sale, making the process straightforward for the customer.
To qualify, you must meet two key criteria. Firstly, you must be ‘chronically sick or disabled’, which HMRC defines as having a physical or mental impairment with a long-term and substantial adverse effect on your ability to carry out everyday activities, or a condition that the medical profession treats as a chronic sickness (e.g., diabetes, arthritis, heart disease). Secondly, the alarm must be for your own personal and domestic use. This VAT relief is a significant government measure, with HMRC data showing it provides savings of around £200 million annually for disabled people across various eligible goods and services.
The process of claiming this relief is simple and does not involve complex paperwork with HMRC. The responsibility lies in making a declaration to your supplier, as this illustration suggests.

As you can see, the process is a tactile, human one. You simply need to complete a form provided by your supplier. Here are the steps involved:
- Confirm Eligibility: Ensure your condition meets the criteria and the alarm is for personal use.
- Obtain a Declaration Form: Your supplier will provide this, or you can download a template directly from the GOV.UK website.
- Complete the Form: Fill in your details and declare that you meet the eligibility criteria.
- Submit to Supplier: Give the completed form to the supplier when you purchase the alarm. You do not send it to HMRC.
- Keep Records: The supplier will remove the VAT from your bill and keep the form for their records. It is wise to keep a copy for yourself.
Call center response vs auto-dialing family: which is safer for a faller?
When choosing a new digital personal alarm, one of the most critical decisions is the response mechanism: a 24/7 monitored call centre or an auto-dialer that alerts family and friends. While an auto-dialer may seem like a more personal and less expensive option, a detailed analysis of the response chain integrity reveals that for a person who has fallen, a monitored system is unequivocally safer. The primary difference lies in speed, expertise, and reliability under pressure. An auto-dialer calls a pre-set list of contacts sequentially. If the first person doesn’t answer, it tries the next, and so on. This process can introduce dangerous delays, especially if contacts are unavailable or their phones go to voicemail.
In contrast, a monitored system connects directly to a trained operator within seconds. For instance, independent testing found a 52-second average response time for some leading providers. This operator is an emergency-trained professional who can assess the situation using a clinical framework, even if the user is unable to speak. They can dispatch an ambulance immediately while simultaneously accessing key medical information. A family member, however loving and well-intentioned, may lack this training, hesitate in a moment of panic, or be located too far away to provide immediate assistance. Furthermore, professional centres filter out false alarms, preventing the ‘alarm fatigue’ that can occur when family members are repeatedly called for non-emergencies, potentially desensitizing them to a real event.
The following table breaks down the critical differences at each stage of an emergency response.
| Response Stage | Monitored Call Centre System | Auto-Dialer Family System |
|---|---|---|
| Fall Detected | Immediate connection to 24/7 monitoring centre | Sequential calls to pre-programmed family contacts |
| Average Response Time | 30-52 seconds to trained operator | Depends on family availability (may reach voicemail) |
| Assessment Authority | Emergency-trained operator with clinical framework | Family member (may lack medical training or hesitate) |
| Ambulance Dispatch | Operator can dispatch immediately if needed | Family must assess, decide, then call separately |
| If User Cannot Speak | Operator dispatches help based on protocol | Family may not understand severity without communication |
| False Alarm Management | Professional filtering, no alarm fatigue risk | Repeated false calls may cause family desensitization |
| Family Notification | Family contacted after emergency services dispatched | Family is first responder (may be 30+ minutes away) |
The error of buying a cheap key safe that isn’t police approved
A personal alarm system is only as effective as the emergency services’ ability to reach you. If you live alone, a secure key safe is not an accessory; it’s an essential component of your safety ecosystem. However, a common and dangerous error is to opt for a cheap, non-certified model. These devices often have weak locking mechanisms, flimsy construction, and 3-4 digit codes that can be easily guessed, making them a target for criminals and potentially invalidating your home insurance. More critically, they may not be recognized or trusted by emergency services, delaying entry in a life-or-death situation.
To ensure both security and swift emergency access, it is imperative to choose a key safe that is police approved. In the UK, this means looking for two key certifications. The first is ‘Secured by Design’, the official police security initiative that marks products as meeting rigorous security standards. The second is an independent security rating, most notably ‘LPS 1175’ (Loss Prevention Standard), which certifies a product’s resistance to physical attack. A police-approved key safe will feature a robust, hardened steel construction, a minimum 10-digit code for enhanced security, and be fully weatherproof for outdoor installation.
As Bill, a former fire captain with 33 years of experience, states in the AARP Family Caregivers Guide:
Police, firemen or paramedics will need to get inside your loved one’s house to help.
– Bill, former fire captain, AARP Family Caregivers Guide
This simple statement underscores the entire purpose of a key safe. To ensure it serves this purpose, use this checklist when purchasing:
- Look for ‘Secured by Design’ certification.
- Check for an ‘LPS 1175’ security rating.
- Verify it has a minimum 10-digit code.
- Ensure it has anti-drill, anti-pick, and anti-saw features.
- Confirm it is designed for outdoor mounting with weatherproof seals.
- Check that your local emergency services are trained to access this model.
- Review your home insurance policy to confirm it accepts the model.
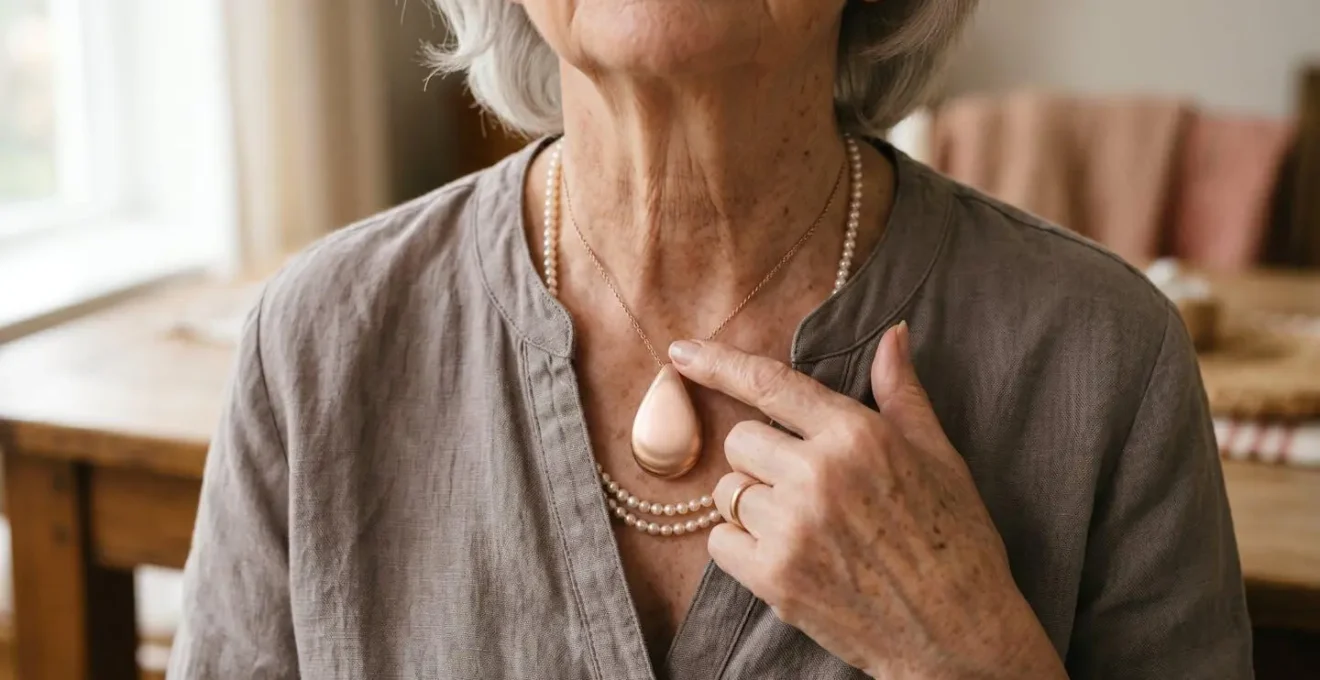
How to choose a stylish alarm that doesn’t look like a ‘panic button’?
One of the biggest barriers to consistently wearing a personal alarm is the stigma associated with traditional, clinical-looking devices. Many seniors feel that a bulky, obvious ‘panic button’ marks them as frail or vulnerable, leading them to leave it on a bedside table where it is useless in an emergency. Today’s manufacturers have responded to this by completely reimagining the personal alarm, transforming it from a medical device into a piece of stylish, discreet, wearable technology. The key is to move away from the idea of a ‘panic button’ and instead think in terms of design archetypes that fit your personal style.
Modern alarms are now disguised as elegant jewellery, sophisticated smartwatches, or minimalist accessories. This aesthetic shift is crucial because a device that you are happy and comfortable to wear is one that will be on you when you need it. When choosing, consider what you would normally wear. If you favour necklaces, a pendant designed to look like a fashion jewel might be perfect. If you are used to wearing a watch, a medical alert smartwatch offers a seamless and functional transition. The goal is to find a device that integrates so well into your daily life that wearing it becomes second nature.
The best designs blend form and function, offering peace of mind without compromising on personal style or dignity, as this image of a modern pendant shows.
Here are five modern design archetypes to consider:
- The Watch: Medical alert smartwatches that look like fitness trackers, offering discreet design with added apps, though fall detection can be limited in some models.
- The Jewel: Pendant alarms designed as decorative necklaces or bracelets, styled to resemble fashion jewellery to encourage constant wear without stigma.
- The Minimalist: Ultra-discreet clip-on buttons for belts or pockets, small and lightweight enough to remain invisible to others.
- The Bluetooth Hybrid: Sleek, contemporary devices that pair with a smartphone, offering a modern aesthetic and long battery life for tech-comfortable users.
- The Classic Reimagined: Traditional pendant designs updated with modern materials like brushed metal, matte surfaces, or faceted, gem-like finishes.
How to install a non-intrusive monitoring system in a period property?
Owning a period property presents a unique challenge when it comes to installing modern safety technology. The desire to protect a loved one can conflict with the need to preserve the home’s historic character, original features, and potentially, its listed building status. The solution lies in choosing technology that is 100% wireless and completely reversible. Drilling into original plasterwork, running cables across ornate skirting boards, or permanently fixing base units to walls is no longer necessary. Modern digital systems are designed with this sensitivity in mind.
The core of a non-intrusive installation is a digital alarm system that operates via a cellular connection, using a built-in multi-network SIM card rather than a landline. This immediately eliminates the need for any phone wiring. Base units can simply be plugged into an existing mains socket and placed on a piece of furniture. All peripheral devices, such as fall detectors or smoke alarms, should be battery-powered (many have batteries lasting 6+ years) and mounted using high-strength, non-damaging adhesive pads or removable brackets. This approach ensures that the entire system can be installed, repositioned, and ultimately removed without leaving a single trace, which is a critical consideration for conservation areas and listed buildings.
Case Study: Taking Care’s Digital Alarm for Period Properties
The Taking Care Digital Personal Alarm is a prime example of a system designed for reversible installation. It operates entirely on cellular connectivity, using two pre-fitted multi-network SIMs to ensure a reliable connection without a landline. The setup is voice-guided, requiring no technician or drilling. The base unit plugs into a mains socket, and the waterproof pendant has a 300-metre range, covering the home and garden. Crucially, the pendant battery lasts for 6 years and is replaced free of charge, avoiding maintenance hassles. Having been laboratory-tested with all major UK digital networks, the system from Taking Care guarantees compatibility and offers a genuinely non-intrusive safety solution for historic homes.
Here are the key principles for a reversible technology installation:
- Choose 100% wireless systems using cellular (SIM) or Wi-Fi connectivity.
- Use adhesive mounting pads or removable brackets for all sensors.
- Opt for battery-powered devices with long-life batteries to avoid visible cables.
- Position base units on existing furniture, not wall-mounted.
- Ensure all equipment can be completely removed, returning the property to its original state.
Where to position PIR sensors so the light comes on before you reach the step?
While personal alarms are crucial for reacting to a fall, a truly comprehensive safety strategy also involves proactive fall prevention. Poor lighting is a major contributor to falls, especially during nighttime trips to the bathroom. Motion-activated lighting using Passive Infrared (PIR) sensors is an effective solution, but only if the sensors are positioned correctly. The most common mistake is placing the sensor directly at or above the hazard (e.g., at the top of the stairs). This creates a ‘dead zone’ where the person is already in danger by the time the light activates. The correct approach is to apply the ‘Path of Travel Principle’.
This principle dictates that the sensor should be positioned at the start of the common path towards the hazard, not at the hazard itself. For example, if the path is from the bedroom to the stairs, the sensor should be placed near the bedroom doorway, aimed towards the stairs. This ensures motion is detected and the light is activated well before the person reaches the first step. You should test the detection zone by walking the path at a normal pace; the light should come on when you are still 1-2 metres away from the risk area. The scale of the problem is significant; for example, in the US, poor home safety contributes to over 3 million fall-related injuries among older adults annually according to CDC data, a stark reminder of why proactive measures are so vital.
Follow this checklist for optimal PIR sensor placement:
- Position the sensor at the start of the path (e.g., bedroom doorway), not at the hazard (e.g., stairs).
- Aim the sensor towards the hazard zone to detect approach.
- Check the sensor’s detection angle (e.g., 120 degrees) and range to ensure it covers the approach path.
- Mount at the correct height (typically 1.2-1.5 metres for wall mount, consult manufacturer specs).
- Test the activation zone by walking the path – the light should activate 1-2 metres before the hazard.
- For nighttime activation, use smart bulbs set to a low brightness (15-20%) to provide safe illumination without causing dazzling or sleep disruption.
Key takeaways
- The digital switchover makes analogue alarms power-dependent; they will fail during a power cut without a battery backup for your router.
- A monitored call centre provides a faster, more reliable, and more expert emergency response than an auto-dialer system that calls family.
- Preserve the character of period homes by using 100% wireless, cellular-based alarm systems and reversible installation methods.
How to adapt a Victorian terrace house for aging in place without ruining its character?
Adapting a character-filled home like a Victorian terrace for aging in place requires a thoughtful, ‘character-first’ approach. The goal is to integrate safety features so seamlessly that they enhance, rather than detract from, the property’s historic aesthetic. This involves a dual strategy: selecting modern technology that is inherently discreet and choosing physical adaptations that complement the period’s design language. It is a misconception that safety must come at the cost of style. With the right choices, a home can be made both safe and beautiful, preserving its heritage and value.
For physical adaptations, the key is to source materials and finishes that match the existing fixtures. For instance, instead of clinical white plastic grab rails, opt for models in brushed brass or polished chrome that echo Victorian-era hardware. On original wooden stairs, use transparent, high-friction tread strips that prevent slips while keeping the historic woodwork visible. For more significant adaptations like stairlifts, choose slimline models with discreet, foldable rails that preserve the narrow hallway’s aesthetic. The guiding principle for all interventions should be reversibility—prioritizing adaptations that can be removed without leaving permanent marks.
Case Study: Character-First Adaptation in Practice
Bill, a former fire captain, provides a perfect example of successful integration in his mother Doris’s period home. He installed a multi-component system featuring a discreet wearable pendant, but crucially, also placed automatic fall detection devices in the bathroom—a high-risk area where the pendant might be removed. The system’s hub provided two-way communication with a professional monitoring centre, all without permanent alterations to the property. Bill’s experience highlights a core principle: effective aging-in-place technology complements the home’s character while ensuring reliable emergency access for those living alone.
Here are some reversible, aesthetic adaptations for a Victorian property:
- Install grab rails in finishes (brushed metal, brass) that match existing period fittings.
- Use transparent, high-friction tread strips on original wooden stairs.
- Choose slimline stairlifts with discreet, folding rails.
- Add subtle LED strip lighting along skirting boards for low-level illumination.
- Use freestanding support poles with tension mounts that require no drilling.
- Select motion sensors designed to be near-invisible or resemble period fittings.
To ensure your safety or that of a loved one is not compromised by the digital switchover, the next logical step is to conduct the Safe Self-Test Protocol outlined earlier. Do not wait for a power outage to discover a system vulnerability; take proactive control of your safety today.