
In summary:
- Prioritise material science: Aluminium offers superior outdoor durability over rubber, which can degrade and smell over time.
- Protect your door’s weather seal: The ramp must sit flush against the threshold without compressing or damaging the crucial seal. Precise measurement is key.
- Avoid the ‘ski slope’ danger: A ramp that’s too short creates a steep, unsafe incline. Always calculate for a gentle gradient, ideally a 1:12 ratio (1 inch of rise for every 12 inches of length).
- Match the ramp to the device: The wheel size of a rollator or wheelchair directly impacts its ability to handle different ramp surfaces and inclines.
That frustrating ‘thud’ followed by a scrape. It’s the sound every wheelchair and rollator user knows when encountering the seemingly small but formidable plastic lip of a modern UPVC door. The common advice is to simply « get a ramp, » but this often leads to a wobbly, ill-fitting piece of rubber that smells in the sun, or a steep metal incline that feels more like a hazard than a help. The reality is that a UPVC door frame, with its integrated weather seal and specific profile, presents a unique engineering challenge that generic solutions fail to address. A poorly chosen ramp doesn’t just make access difficult; it can compromise the thermal efficiency and weatherproofing of your home by damaging the essential seal.
This guide moves beyond simplistic advice. We will not just list ramp types. Instead, we will adopt the mindset of a door access specialist. The key isn’t simply bridging a height gap; it’s about achieving a precision-engineered interface between your mobility device, the ramp, and the unique architecture of your doorway. Understanding the material science behind ramp longevity, the physics of a safe gradient, and the critical importance of that compressible weather seal is the only way to find a solution that is not just functional, but truly seamless and secure.
This article will deconstruct the problem, providing a detailed framework for making an informed decision. We will analyze material trade-offs, master the art of installation without compromising your door, calculate the perfect slope, and even consider how the type of mobility device you use influences the ideal ramp choice. By the end, you’ll be equipped to select a threshold ramp with the confidence of an expert.
Summary: How to choose the right threshold ramp for a UPVC door frame?
- Why do rubber ramps smell and degrade outdoors compared to aluminum?
- How to install a ramp without blocking the weather seal of the door?
- Folding suitcase ramps vs permanent concrete: which is best for visitors?
- The mistake of buying a ramp that is too short and creates a ‘ski slope’
- How to disguise a concrete ramp with planters and paving?
- Flush thresholds vs ramped strips: achieving a seamless flow between rooms
- Pneumatic vs solid tires: which stops the vibration on cobblestones?
- How to choose the right rollator for rough UK pavements vs indoor use?
Why do rubber ramps smell and degrade outdoors compared to aluminum?
When selecting an outdoor threshold ramp, the choice between rubber and aluminum extends far beyond aesthetics. It’s a fundamental decision about long-term material integrity. Rubber ramps, often made from recycled tires, are heavy and provide excellent grip. However, they are susceptible to environmental degradation. Exposure to UV radiation from the sun and fluctuating temperatures causes the chemical bonds in the rubber to break down. This process, known as outgassing, releases volatile organic compounds (VOCs), which are responsible for the distinct « hot tire » smell, especially on warm days. Over time, this degradation leads to the material becoming brittle, cracked, and less effective.
In contrast, aluminum is a far more stable material for permanent outdoor use. As Med Access Inc. notes, « Aluminum’s natural resistance to rust and corrosion means the ramp will maintain its structural integrity even in harsh weather conditions. » It does not absorb water, will not rot like wood, and is impervious to the UV damage that plagues rubber. While both materials offer similar load-bearing capabilities, the key difference lies in their lifespan when exposed to the elements.
A detailed comparative study highlights this distinction, likening the wear on rubber ramps to that of gym shoes—the more they are used and exposed, the faster they wear out. The study found that while rubber ramps can last for years, they will eventually need replacement. Aluminum, on the other hand, is a « buy it once » solution that will likely never need replacing due to its inherent durability. While the initial investment might be slightly higher, the longevity and low maintenance of aluminum make it the superior choice from a specialist’s perspective for any permanent outdoor installation.
How to install a ramp without blocking the weather seal of the door?
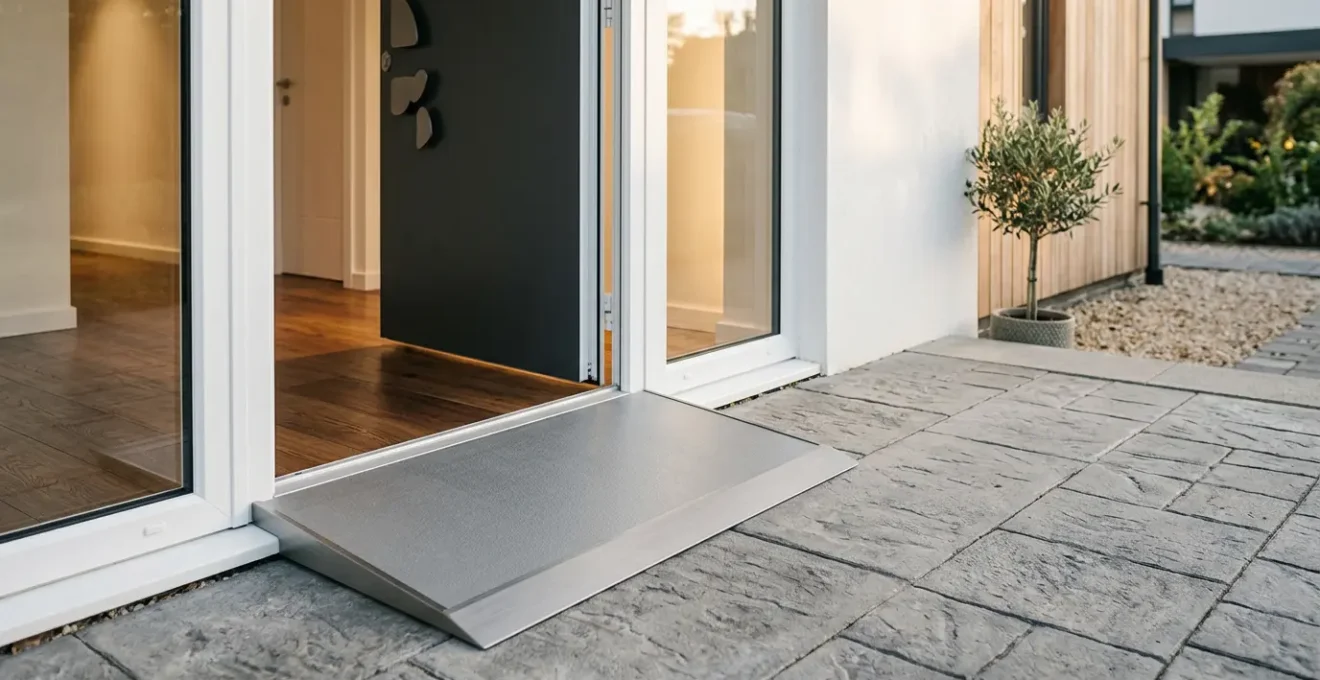
The single most critical, and often overlooked, aspect of installing a threshold ramp against a UPVC door is the interaction with the weather seal. This compressible gasket, typically made of black EPDM rubber, is not just a decorative trim; it’s a high-performance component engineered to create an airtight and watertight barrier when the door is closed. Placing a ramp incorrectly, so that it sits on top of or constantly compresses this seal, will permanently damage it, leading to drafts, water ingress, and a significant loss in your home’s thermal efficiency. The goal is for the top edge of the ramp to sit perfectly flush against the solid part of the threshold, leaving the seal completely unobstructed to do its job.

As the image above illustrates, the seal has a specific profile designed to compress into a channel when the door closes. Any constant pressure from a ramp will flatten it, destroying its ability to rebound and seal the gap. Achieving a perfect fit requires precision, not guesswork. It involves measuring the height from the ground to the top of the solid threshold—not to the top of the flexible seal. This measurement determines the required height of your ramp.
Your Action Plan: Measuring for a Perfect Threshold Fit
- Identify the Hard Threshold: Open the door and locate the solid, non-compressible part of the UPVC frame that the weather seal is attached to. This is your target surface.
- Take Precise Height Measurements: Using a rigid tape measure, measure the vertical distance from the ground outside to the very top of this hard threshold. Take three measurements: one on the left, one in the middle, and one on the right. Use the highest of the three numbers.
- Assess for Level Ground: Place a long spirit level on the ground where the ramp will sit. Is it perfectly level? If not, you may need a ramp with adjustable feet or will have to level the surface to prevent the ramp from rocking.
- Measure Available Space: Measure the horizontal distance from the door threshold outwards. This determines the maximum length of ramp you can accommodate, which is crucial for calculating a safe slope.
- Final Verification: Before ordering, create a mock-up using a piece of cardboard cut to the ramp’s height and proposed length. Place it against the threshold to visually confirm it will sit flush without interfering with the weather seal and that the slope feels manageable.
–
Folding suitcase ramps vs permanent concrete: which is best for visitors?
The right ramp solution is heavily dependent on the user. Is the ramp for a permanent resident who will use it daily, or for occasional visitors, such as grandchildren or friends in wheelchairs? For visitors, the priority is often flexibility, cost-effectiveness, and non-permanent installation. This is where portable or « suitcase » ramps excel. These lightweight aluminum ramps fold in half for easy storage and can be deployed in minutes, requiring no building permits or structural changes to the property. They are an ideal solution for providing temporary access without the commitment and expense of a permanent structure.
On the other hand, if accessibility is a daily requirement for a household member, a permanent ramp made of concrete or a modular aluminum system is a more robust and safer long-term investment. While the upfront cost and installation time are significantly higher—often involving building permits and construction work—they provide unparalleled stability and durability designed to withstand constant, heavy use, including with heavy power chairs.
The following table provides a clear comparison of the key factors to consider when deciding between a portable solution for visitors and a permanent installation for residents. The data, drawn from a detailed analysis by mobility experts, highlights the distinct use cases for each type.
| Feature | Portable/Suitcase Ramps | Permanent Ramps |
|---|---|---|
| Installation Time | Minutes – no construction required | 3-6 weeks with permits and inspections |
| Initial Cost | Low ($65-$315 for threshold ramps) | High ($100-$250 per linear foot) |
| Portability | Foldable, can be taken on the go | Fixed in place, cannot be moved |
| Durability | Good, but less stable for heavy power chairs | Excellent, designed for daily heavy use |
| Permits Required | No (considered non-permanent structure) | Yes (local building permits needed) |
| Best For | Occasional visitors, travel, temporary recovery | Daily use, live-in caregivers, long-term accessibility |
The mistake of buying a ramp that is too short and creates a ‘ski slope’
The most common and dangerous mistake in ramp selection is choosing one that is too short for the height it needs to overcome. This creates an excessively steep incline, often referred to as a « ski slope, » which poses a significant safety risk. For a manual wheelchair user, ascending a steep ramp requires enormous upper body strength, while descending can cause the chair to pick up speed uncontrollably, risking a fall or a tip-over. For a rollator user, the incline can be simply impassable. This issue is not subjective; it is a matter of physics and established safety standards.
To ensure safety and usability, accessibility guidelines provide clear specifications for ramp gradients. For public and commercial buildings, the ADA Standards specify a maximum running slope of 1:12. This ratio means that for every 1 inch of vertical rise, there must be at least 12 inches (1 foot) of horizontal ramp length. This equates to an angle of about 4.8 degrees. While these regulations are not legally mandated for private residences, they serve as the gold standard for safety. As the U.S. Access Board states, « Providing the least possible slope below the 1:12 (8.33%) maximum offers better usability for a wider range of users. »
Case Study: The Residential Slope Compromise
While commercial ramps must adhere to the strict 1:12 ratio, residential applications often see steeper slopes due to space constraints. Some guidelines suggest a 2:12 ratio (a 2-inch rise per foot of ramp) is acceptable for residential use if the user has good upper body strength or assistance. However, this nearly 10-degree slope can still be challenging. A 3:12 ratio (almost 15 degrees) should only be considered for loading unoccupied chairs or with a powerful scooter. For independent, safe access, striving for the 1:12 ratio is always the best practice to prevent a dangerous ‘ski slope’ situation.
How to disguise a concrete ramp with planters and paving?
While a concrete ramp offers supreme durability, its utilitarian appearance can detract from a home’s curb appeal. However, with thoughtful landscape design, a concrete ramp can be transformed from a purely functional structure into an integrated and attractive garden feature. The goal is to soften its hard lines and help it blend seamlessly with the surrounding environment, making it feel like a deliberate part of the landscape rather than an afterthought. This approach not only improves aesthetics but also enhances the sense of dignity and normalcy for the user, framing accessibility as beautiful design.
The key is to use natural materials and strategic planting to break up the mass of concrete. Flanking the ramp with raised planter beds or large, attractive pots can introduce color, texture, and life. Choosing plants with varying heights and forms creates visual interest and helps the ramp recede into the garden. Furthermore, the concrete itself can be treated to be more decorative. Instead of a plain grey slab, consider using tinted or stamped concrete to mimic the look of natural stone or brick pavers, matching it to an existing patio or walkway for visual continuity.

Here are several professional design techniques for integrating a concrete ramp into your landscape:
- Use tinted concrete to match existing patios or outdoor surfaces, creating visual continuity.
- Apply stamped concrete techniques to mimic stone, brick, or pavers, giving the ramp a high-end architectural appearance.
- Integrate low-voltage LED strip lighting along the ramp edges to define the path at night while creating an upscale safety feature.
- Incorporate planter boxes or raised garden beds along the ramp sides to soften the structure and help it blend into the garden.
- Create a ‘living ramp’ by allowing low-growing groundcover like creeping thyme to grow over the edges of wider, gently sloped ramps, naturalizing the structure.
Flush thresholds vs ramped strips: achieving a seamless flow between rooms
While exterior access is a primary concern, creating a seamless flow *between* rooms is equally important for true home mobility. Interior doorways often present small but jarring thresholds, and the choice lies between a low-profile ramped strip or a more integrated flush threshold. A ramped strip is an add-on solution—a small wedge of rubber, aluminum, or wood placed against the existing threshold. It is inexpensive, easy to install, and easily reversible, making it an excellent, low-impact choice for renters or those needing a quick fix.
The alternative is a flush or low threshold, which involves modifying or replacing the door and frame itself. As noted by Dekko Windows, « Low threshold uPVC doors are designed with accessibility in mind… these types of doors feature a significantly reduced step height. » This is a more permanent, structural solution that creates a completely level and seamless transition. While its aesthetic integration is superior, it is a more invasive and costly project. It can also sometimes have minor impacts on the door’s overall weather and thermal sealing performance compared to a standard, high-lipped threshold, a trade-off that must be carefully considered.
The best choice depends on balancing cost, invasiveness, and the desired level of aesthetic integration. The following table, based on an analysis of low-threshold door solutions, breaks down the key differences.
| Factor | Flush Thresholds | Ramped Strips |
|---|---|---|
| Installation Cost | High – requires door replacement or modification | Low – add-on solution ($50-$200) |
| Invasiveness | High – structural change to doorway | Low – surface addition only |
| Reversibility | Low – permanent modification | High – easily removed without damage |
| Aesthetic Integration | Excellent – seamless appearance | Moderate – visible transition element |
| Weather Performance | May reduce thermal/weather sealing | Maintains existing door seal integrity |
| Typical Step Height | Designed for minimal or zero step (under 17mm) | Accommodates 1/2 inch to 6 inches |
Pneumatic vs solid tires: which stops the vibration on cobblestones?
The comfort of using a ramp is not solely determined by the ramp itself; it’s a dynamic interaction between the ramp’s surface and the tires of the mobility device. This is especially true for textured aluminum ramps, which provide excellent grip but can also transmit high-frequency vibrations. The choice between pneumatic (air-filled) tires and solid tires on a wheelchair or rollator plays a massive role in dampening these vibrations, much like how a car’s suspension smooths out a bumpy road.
Pneumatic tires are the superior choice for vibration absorption. The air inside acts as a natural cushion, effectively soaking up the jarring feedback from textured surfaces like aluminum ramps or uneven ground like cobblestones. This results in a much smoother, more comfortable ride and reduces fatigue for the user. However, they require maintenance, including monitoring air pressure (typically 35-65 PSI) and patching potential punctures.
Solid tires, on the other hand, are maintenance-free. They are made of rubber or polyurethane and cannot go flat. While this offers peace of mind, they transmit far more vibration to the user’s body as there is no air to cushion the ride. For users who primarily travel on smooth indoor surfaces, this is less of an issue. But for outdoor use on varied terrain and metal ramps, the jarring can be significant and uncomfortable. For those with solid tires experiencing discomfort, adding high-quality, textured anti-slip tape to a smooth ramp surface can sometimes help by changing the vibration frequency, but it is not a substitute for the cushioning of pneumatic tires.
Key takeaways
- Material Integrity is Paramount: For outdoor use, aluminum’s resistance to rust and UV degradation makes it a far more durable, long-term investment than rubber.
- The Slope is a Non-Negotiable Safety Feature: Always calculate for a gradient of 1:12 or less. A ramp that is too short creates a dangerous « ski slope » that compromises user safety.
- Protect the Weather Seal: The primary directive when fitting a ramp to a UPVC door is to ensure it sits flush against the hard threshold, leaving the compressible weather seal completely untouched.
How to choose the right rollator for rough UK pavements vs indoor use?
The effectiveness of any ramp is directly tied to the specifications of the mobility device using it. A ramp that is perfect for a large-wheeled power chair might be completely unsuitable for a small-wheeled indoor rollator. When choosing a rollator, especially in the context of navigating ramps and varied UK pavements, wheel size and brake performance are the two most critical factors to consider. This turns the selection process into a strategic choice about the entire mobility system, not just its individual parts.
A practical accessibility study found that wheel diameter has a profound impact. Indoor-focused 3-wheel rollators with small (e.g., 6-inch) casters struggle with even minor transitions and require very smooth ramp surfaces. In contrast, 4-wheel outdoor rollators with larger 8 to 10-inch tires can handle slightly steeper gradients and textured surfaces with much greater ease. These larger wheels roll over obstacles rather than getting stuck in them. The study also noted that these larger, all-terrain rollators have a wider turning radius, which necessitates a larger, clear landing area at the top of the ramp (a minimum of 60×60 inches is recommended) to safely maneuver through the doorway.
Equally important is brake performance, especially on a slope. The rollator’s brakes must be capable of holding the user’s weight securely mid-ramp, both on ascent and descent. A regular safety check is essential:
- Position your rollator mid-slope on the ramp and fully engage the parking brakes.
- Apply firm pressure forward and backward. The rollator should not move more than an inch.
- If there is movement, adjust the brake cable tension according to the manufacturer’s instructions.
- Repeat the test until the brakes hold firmly under your body weight.
- Ensure the brakes engage quickly and reliably when used during a slow, controlled descent.
With this detailed knowledge of materials, measurements, safety physics, and equipment, you are now fully equipped to assess your doorway, analyze your needs, and select a threshold ramp that provides safe, durable, and truly seamless access for years to come.