
Adapting a period entrance for a rollator user doesn’t mean sacrificing its historic charm for a clinical, modern ramp.
- Understand the strict legal line between your property boundary and the public pavement before planning any ramp.
- Use subtle ‘half-steps’ and ergonomic, period-appropriate handrails to manage height changes and provide secure support.
- Relocate functional elements like letterboxes and rethink lighting to improve daily dignity and anticipatory safety.
Recommendation: Focus on a series of small, sympathetic integrations that respect the building’s character, rather than a single, intrusive alteration.
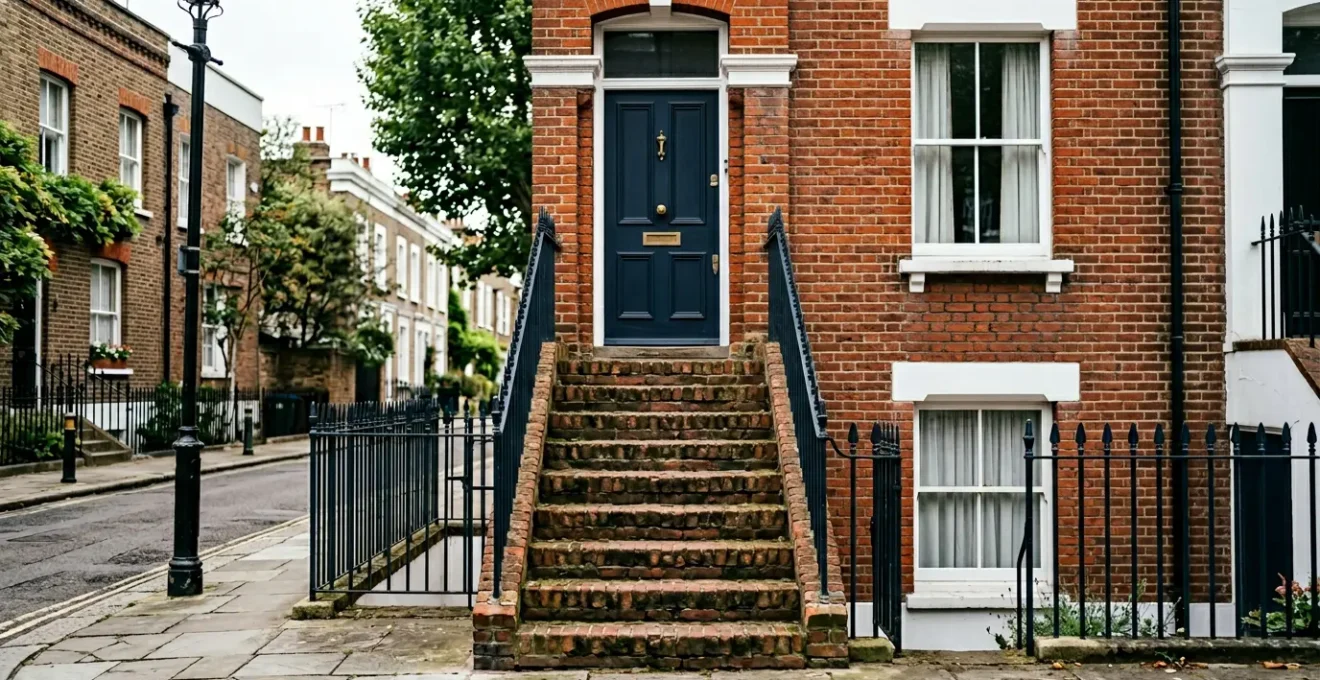
The quintessential image of a Victorian terraced house, with its steep stone steps leading to a heavy panelled door, evokes a sense of enduring character. Yet for a resident who uses a rollator, this cherished feature becomes a daily, daunting barrier. The challenge many homeowners face is a difficult one: how to introduce modern accessibility without erasing the very soul of their period property? The common solutions often presented—stark metal ramps and functional plastic handrails—can feel like a crude imposition on a building’s historic fabric, a compromise that satisfies function but sacrifices form.
This dilemma often leads to inaction, as the fear of navigating planning permissions or spoiling the home’s kerb appeal becomes overwhelming. However, the solution is not about adding accessibility features *to* the house, but about thoughtfully and creatively *integrating* them *within* its existing character. The true key is to reframe the problem. Instead of asking « How can I add a ramp? », we should be asking, « How can I create a dignified and safe arrival experience that feels like it has always belonged here? »
This guide moves beyond the generic advice. As a conservation architect, my focus is on sympathetic integration—a series of subtle, respectful, and often surprisingly simple interventions. We will explore how to negotiate level changes gracefully, choose materials that honour the past, and position functional elements to enhance, not detract from, your home’s unique identity. By understanding the principles behind the regulations and the ergonomics of movement, you can create an entrance that is not only compliant and safe but also beautiful and welcoming.
This article will guide you through the critical considerations, from legal boundaries to the fine details of material choice and lighting design, providing a clear path to a successful and respectful adaptation.
Summary: A guide to adapting Victorian terraced entrances for rollator access
- Why can’t you put a ramp on a public pavement without council permission?
- How to use ‘half-steps’ to break down a high threshold safely?
- Wrought iron rails vs white plastic: maintaining kerb appeal
- The error of having a low letterbox that causes dizziness when collecting post
- Where to position PIR sensors so the light comes on before you reach the step?
- The mistake of buying a ramp that is too short and creates a ‘ski slope’
- How to get Part M compliance signed off for your extension?
- How to create a truly open-plan ground floor in a UK semi-detached house?
Why can’t you put a ramp on a public pavement without council permission?
The first and most critical boundary to understand is not the physical one of your front wall, but the legal one of the public highway. Many homeowners assume the pavement outside their property is theirs to modify, but placing any structure, including a « temporary » ramp, on it constitutes an obstruction. This is a matter of public safety and liability. The pavement must remain clear for all pedestrians, especially those with visual impairments or who use wheelchairs, and any unauthorised structure can create a trip hazard or an impassable barrier. This is why local authorities have stringent rules, backed by legislation like the Highways Act 1980.
The legal perspective is clear, as experts in UK landscaping and highways regulations explain. The placement of a ramp on public land is not a minor adjustment; it is considered an unauthorised occupation. As Landmark Landscaping UK clarifies in their guide on driveway ramps, « Placing a ramp on public property, such as a pavement or highway maintained by the local council, brings legal obligations. It is considered unauthorised occupation. » This is not a guideline to be interpreted loosely; ignoring it can result in immediate enforcement action.
The consequences for failing to seek permission are not just theoretical. Councils have the authority to demand the immediate removal of the obstruction and can issue penalties. These can start with fines from around £100 for unauthorised pavement obstruction and can escalate if the instruction to remove it is ignored. Therefore, any solution that extends beyond your private property line, known as the curtilage, must begin with a formal application to your local council’s highways department. This ensures your proposed solution is safe, compliant, and avoids any legal or financial penalties.
How to use ‘half-steps’ to break down a high threshold safely?
Once you are working within your property’s boundary, the next challenge is the vertical climb. A typical Victorian entrance can have a threshold 150-300mm (6-12 inches) or more above the garden path. For a rollator user, lifting the device and stepping up this height in one go is unstable and dangerous. While international accessibility standards aim for thresholds no higher than 13mm, this is simply unachievable in a period property without major works. The solution is not to create one single, steep ramp, but to break the height down into manageable stages. This is the principle of threshold negotiation through half-steps.
A half-step is essentially an intermediate platform or a very deep, low-rise step that reduces the height of each individual riser. Instead of one large step, you create two or more smaller, more manageable ones. This allows the user to lift the rollator onto the first level, stabilise themselves, and then tackle the next. The key is to make the platform deep enough (ideally at least 900mm) to comfortably accommodate the user and the entire rollator, creating a safe resting point. This approach is far safer and requires less strength than navigating a single, imposing step.
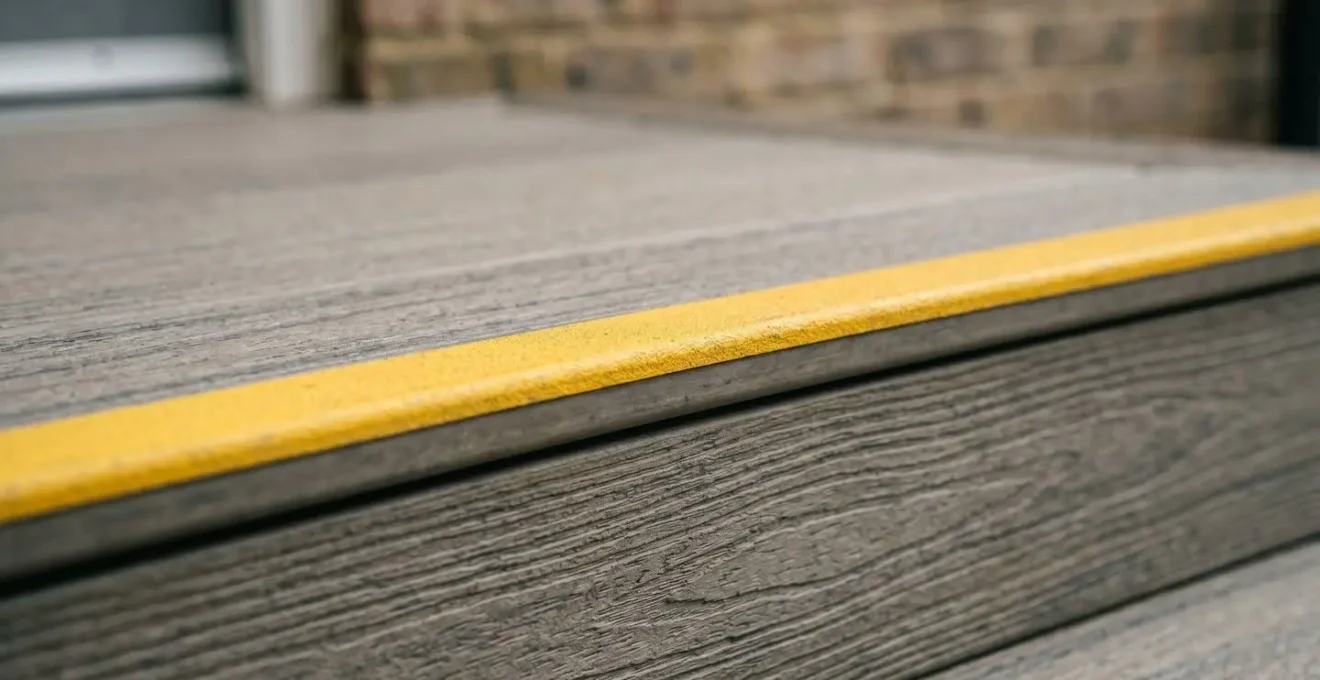
As this image demonstrates, the design of the half-step is crucial for safety. The surface must be robust and non-slip, even in wet conditions. Modern composite materials or textured stone can provide excellent grip while complementing the brick or stonework of the house. Crucially, the edge of each step should feature a high-contrast nosing strip. This provides a clear visual cue for those with low vision, defining the edge of the step and preventing missteps. This small detail dramatically enhances safety without compromising the overall aesthetic.
Wrought iron rails vs white plastic: maintaining kerb appeal
Handrails are not just a legal requirement for ramps and steps; they are a critical stability aid for anyone with reduced mobility. However, the choice of material and design can make the difference between a respectful addition and an eyesore. The ubiquitous white uPVC or standard galvanised steel rails, while functional, often clash violently with the rich material palette of a Victorian home. The principle of material honesty guides us to choose materials that are sympathetic to the building’s era. For a Victorian terrace, this almost always points towards wrought or cast iron.
A bespoke wrought iron handrail can be designed to echo the details of original railings on the property or in the neighbourhood, making it feel like an integral part of the architecture. It can be finished in a traditional satin or matte black, providing a timeless look that enhances kerb appeal. Beyond aesthetics, the ergonomic design is paramount. For older users, particularly those with arthritis or reduced grip strength, the diameter and shape of the rail are critical. A rail that is too thick or too thin can be difficult and painful to grasp securely. Extensive research helps define the optimal dimensions for user comfort and safety.
For instance, scientific research indicates an optimal handrail diameter of 36-40mm provides a secure and comfortable power grip for elderly users. This contrasts with larger, more decorative profiles that may look substantial but fail the test of practical use. Further studies, such as research in Japan with elderly participants, have reinforced the importance of this detail, finding a similar optimal range. These studies also highlight the need for horizontal extensions at the top and bottom of the steps, allowing the user to grip the rail for stability *before* they ascend and *after* they descend. A thoughtfully designed wrought iron rail, therefore, combines historical authenticity with modern ergonomic science.
The error of having a low letterbox that causes dizziness when collecting post
Accessibility is not just about entering the house; it’s about performing daily tasks with dignity and without risk. One of the most overlooked hazards of a traditional Victorian door is the low-level letterbox. Bending down to retrieve mail can be a significant challenge for someone with balance issues, back pain, or conditions like orthostatic hypotension, which can cause dizziness upon standing up. This daily act, so simple for many, becomes a source of anxiety and a genuine fall risk. It also affects others; the Communication Workers Union (CWU) has highlighted the thousands of back-related injuries postal workers sustain from stooping to low letterboxes.
The solution is not necessarily to replace the beautiful, original period door, which would be an aesthetic and conservation tragedy. A far more sympathetic and practical approach is to seal the existing letter plate and install a separate, external wall-mounted mailbox. This immediately resolves the ergonomic issue. By placing the mailbox at a comfortable height, the need to bend is eliminated entirely. This simple change contributes immensely to the dignity of arrival and daily living, making the home safer and more comfortable.
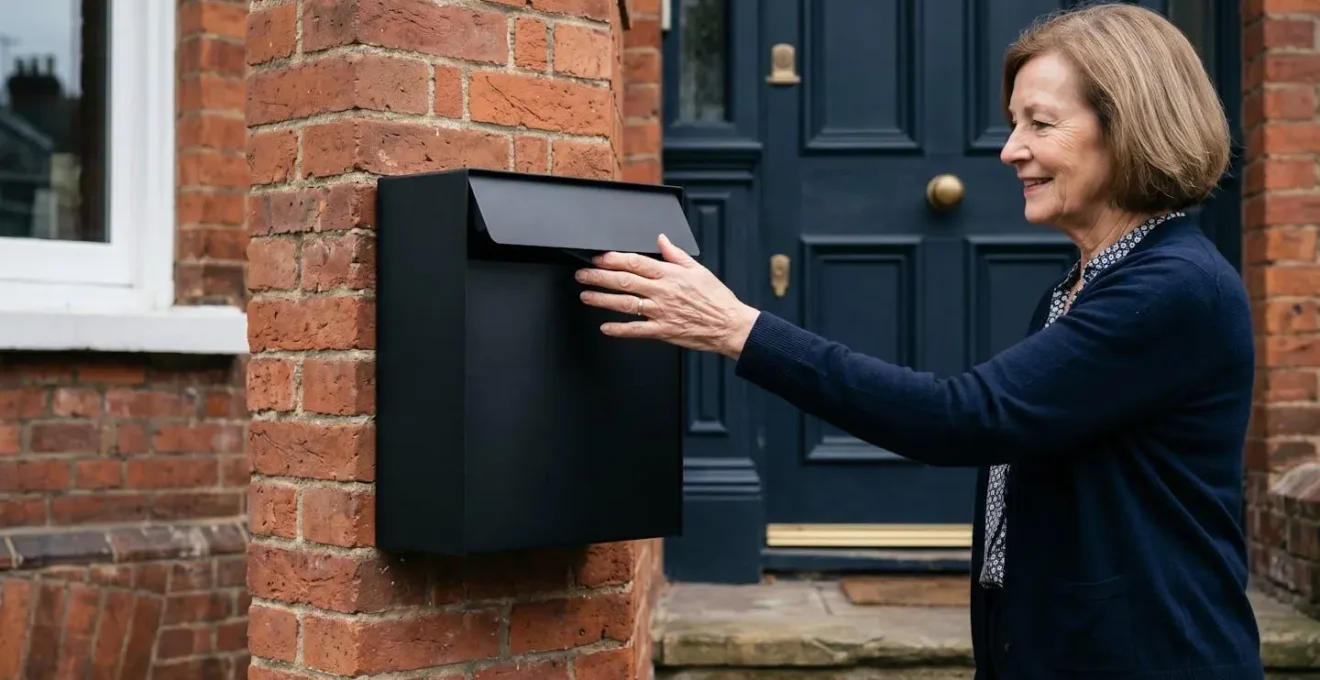
When selecting an external mailbox, choose a design that complements the period architecture. A simple, elegant design in a matte black or dark bronze finish can sit harmoniously against Victorian brickwork. The positioning is key, and UK guidelines provide a clear framework. For example, the Lifetime Homes Standard recommends a height range of 450mm to 1200mm from the ground to the letterbox opening. This ensures it is easily reachable from a standing or seated position without stooping, making it a truly inclusive solution.
Where to position PIR sensors so the light comes on before you reach the step?
Safe navigation of steps in low light or at night is non-negotiable. While a standard porch light is a good start, it often requires fumbling for a switch inside. A motion-activated (PIR) sensor light is a far better solution, but its placement is everything. The common mistake is to install a single, powerful floodlight with a sensor right above the door. This creates two problems: the light only activates when you are already at the top of the steps, and the sudden, harsh glare can be disorienting. The goal is what I call anticipatory lighting: a system that illuminates your path *before* you need it.
To achieve this, you need to think in terms of detection zones. The primary sensor should not be at the door itself, but positioned to cover the approach path from the gate or pavement. By placing a sensor on a gate post or a low garden wall, the lights will switch on the moment you enter the property, illuminating the entire pathway and steps ahead of you. This gives your eyes time to adjust and allows you to see any potential obstacles long before you reach them. This creates a genuine sense of welcome and security, rather than a startling reaction to sudden light.
Furthermore, instead of one harsh overhead light, consider a layered approach. Use multiple, low-level, downward-facing fittings to wash light across the step treads themselves. This avoids glare while clearly defining the walking surface. There are many period-style bulkhead or lantern lights available that incorporate discreet PIR sensors, allowing you to maintain a traditional aesthetic. A well-designed lighting scheme is one of the most effective and relatively low-cost ways to improve entrance safety, providing a reassuring pathway from the street to your front door.
The mistake of buying a ramp that is too short and creates a ‘ski slope’
When a ramp is the only viable option, its gradient is the single most important factor for safety. A common and dangerous mistake is to purchase a pre-made ramp based only on the height it needs to cover, without considering the length required to achieve a safe slope. This results in a ramp that is far too steep—effectively a ‘ski slope’—which is perilous to ascend and even more so to descend with a rollator. An overly steep ramp requires immense effort to push up and can cause the user to lose control on the way down, leading to serious falls.
The established benchmark for a safe ramp gradient is a 1:12 ratio. This means for every 1 inch of vertical rise, you need at least 12 inches of horizontal ramp length. For example, a single 6-inch step would require a ramp that is at least 6 feet (72 inches) long. While UK Building Regulations (Part M) can sometimes permit steeper gradients (up to 1:12 for dwellings), the 1:12 ratio is the gold standard for usability and safety, especially for unassisted rollator or manual wheelchair users. Calculating this correctly is the first step to avoiding a costly and dangerous mistake.
However, gradient is only one part of a safe ramp system. A truly functional ramp requires careful consideration of landings, surfaces, and handrails to be effective. These elements work together to create a secure route from bottom to top.
Your action plan: Key ramp safety specifications to verify
- Calculate gradient: Ensure the ramp slope does not exceed a 1:12 ratio (for every 1 unit of height, you need 12 units of length). For existing dwellings, a steeper gradient up to 1:12 may be permissible but should be a last resort.
- Provide level landings: A flat, level platform of at least 1.2m x 1.2m (1.5m x 1.5m is better) is essential at both the top and bottom of the ramp for resting, turning, and opening the door without rolling backwards.
- Check surface continuity: The ramp surface must be firm, non-slip, and solid. Avoid modular ramps with gaps between sections, as the small wheels of a rollator can easily get stuck, causing a sudden stop and a fall.
- Add handrails: According to guidance on ramp adaptations, handrails should be installed on both sides of any ramp run longer than 2 metres and should be positioned at a height between 900mm and 1000mm.
How to get Part M compliance signed off for your extension?
Any significant alteration to your home’s entrance, even if it’s « just » adding a ramp or steps, is not a simple DIY project from a legal standpoint. These changes fall under the scope of UK Building Regulations, specifically Approved Document M, which covers ‘Access to and use of buildings’. The regulations are in place to ensure that any work done is safe, accessible, and structurally sound. Failing to comply can cause major issues when you come to sell your property and may even force you to undo the work.
The key takeaway is that these adaptations are considered a ‘material alteration’. As the national body for home improvement agencies, Foundations UK, explains, « When you alter a home’s entrance to improve accessibility—such as adding a ramp—this work counts as a material alteration to the building. It affects Requirement M of the Building Regulations… As a result, you must notify your local authority about the changes. » This means you or your builder will need to submit a Building Notice or a Full Plans Application to the local council’s Building Control department before work commences. An inspector will then check the plans and the finished work to ensure it meets all relevant standards before issuing a completion certificate, which is the official sign-off.
Navigating this process can seem daunting, but it is a crucial step to ensure the work is safe and legally recognised. Furthermore, homeowners should be aware of financial support available. The Disabled Facilities Grant (DFG) is a council-run, means-tested grant designed to help cover the costs of home adaptations for disabled residents. The government’s investment in this scheme, with spending review data showing £573 million allocated for 2021-2022, demonstrates a commitment to helping people live independently. Applying for a DFG often involves an assessment by an Occupational Therapist, who can also provide expert recommendations on the most suitable adaptations for your specific needs, strengthening your Building Control application.
Key takeaways
- Prioritise sympathetic integration over intrusive additions to maintain your home’s historic character.
- Always address legal requirements (Highways Act, Building Regulations Part M) before starting any physical work.
- Focus on a series of small, ergonomic improvements—like half-steps, handrail diameter, and letterbox height—for the greatest impact on daily safety and dignity.
How to create a truly open-plan ground floor in a UK semi-detached house?
A perfectly designed accessible entrance is only half the battle. The concept of a dignified arrival extends beyond the front door and into the home itself. It is of little use to create a seamless entry if the user is immediately met with a narrow, cluttered hallway that is impossible to navigate with a rollator. True accessibility requires thinking about the entire user journey. In many UK semi-detached homes, this means reconsidering the traditional ground floor layout of separate, constrained rooms and moving towards a more open-plan environment that allows for freedom of movement.
Creating this flow doesn’t necessarily mean removing every wall. It’s about ensuring key pathways are wide enough for comfortable passage. For a rollator or indoor wheelchair user, narrow doorways and tight corners are major barriers. As a rule of thumb, accessibility design standards specify a minimum clear pathway width of 1200mm to allow for easy turning and maneuvering. This might involve widening a key doorway into the main living space or removing a non-structural section of a hallway wall to create a more generous circulation area. The goal is to create an uninterrupted path from the entrance through to the primary living areas like the lounge and kitchen.
The space required can vary significantly depending on the specific mobility device used. Understanding these dimensions is crucial when planning any internal alterations. A simple rollator has a much smaller footprint than a large, powered wheelchair, and planning should reflect the current and potential future needs of the resident.
| Mobility Device Type | Turning Circle Diameter | Recommended Pathway Width | Application Context |
|---|---|---|---|
| Standard Wheelchair | 1500mm | 1200-1500mm | Indoor residential hallways, common areas |
| Large Wheelchair | 1700mm | 1500mm+ | Accessible public buildings, healthcare facilities |
| Indoor Wheelchair | 1245mm | 1000-1200mm | Compact indoor residential spaces |
| Rollator (3 or 4 wheel walker) | 900-1200mm | 900-1200mm minimum | Residential entrances, narrow corridors |
By applying these principles of sympathetic integration, material honesty, and user-focused design, you can transform your home’s entrance from a barrier into a beautiful, dignified, and welcoming feature. For a detailed assessment of your property and to develop a bespoke adaptation plan, seeking advice from a conservation-accredited architect or a specialist access consultant is the recommended next step.